
Plafonds Armstrong : technologie d'installation et recommandations utiles. La bonne façon d'installer un plafond suspendu Armstrong Technologie d'installation de plafond Armstrong
Une technologie simple Lors de l'installation d'un plafond, Armstrong vous permet de le monter sans même avoir une telle pratique.
Examinons ce processus plus en détail.
Préparation
Vous aurez besoin de :
- (illustré ci-dessous);
- consommables: dalles de plafond, rayons de suspension, profilés porteurs, coin, clous 6x40 pour le coin, ancre de coin pour la suspension ;
- outils : marteau perforateur, fil à peindre, ciseaux à métaux, niveau laser ou hydraulique, marteau, pince, crayon et mètre ruban.
Instructions d'installation
Donc, comment installer un plafond Armstrong de vos propres mains? Examinons l'ensemble du processus étape par étape :
Étape n°1. Marquage du plafond
Vous devez d’abord déterminer quelle partie du plafond de base est la plus basse. Toutes les dalles de sol ne sont pas parfaitement de niveau, car même SNiP autorise certains écarts par rapport à l'horizontale. Pour trouver le point le plus bas, utilisez un niveau (hydraulique ou laser). Si vous utilisez un niveau hydraulique, placez des marques autour du périmètre de la pièce à n'importe quelle hauteur qui vous convient, en particulier dans les coins - à la fois internes et externes (le cas échéant). Ensuite, à l'aide d'un ruban à mesurer, mesurez la distance entre le plafond et la marque. Si vous utilisez un laser, le marquage n'est pas nécessaire. Nous mesurons immédiatement la distance jusqu'à la ligne laser. Là où la valeur est plus petite, il y a le point le plus bas.

Après cela, nous marquons l'endroit où est fixé le coin de support, d'abord au point le plus bas, en l'abaissant d'au moins 15 cm du plafond principal.

Ensuite, nous mesurons la distance entre ce repère et le repère posé à l'aide d'un niveau hydraulique, ou jusqu'à la ligne laser. Nous transférons la valeur résultante aux angles restants.

Ensuite, à l'aide d'un fil à peintre, les points sont reliés entre eux.

Étape n°2. Centrage du plafond
Si le plafond est centré de manière à ce qu'il y ait des coupes égales sur les côtés, vous devez alors trouver le centre de la pièce. Pour ce faire, mesurez ses côtés et marquez leur milieu. Nous connectons les centres opposés avec un fil de teinture - l'endroit où ils se croisent au plafond sera le centre même.

Un profil de guidage de 3,7 mètres longera ensuite la longue ligne. Parallèlement, nous marquons d'autres lignes par incréments de 1,20 m.
Note: si la garniture ne s'intègre pas dans le design intérieur, vous devez alors expérimenter en déplaçant les panneaux pour les rendre plus petits ou plus grands sur différents côtés.
Dans notre exemple, la pièce mesure 4x6 mètres et, en passant le profilé de guidage au centre de la pièce, la garniture au mur sera de 200 mm. Si vous décalez les lignes de la moitié du carreau (300 mm) par rapport au centre, la garniture sera de 500 mm. Presque une tuile entière. Par conséquent, nous effectuons un changement et passons à autre chose.


A partir de la courte ligne transversale centrale sur toutes les longues lignes parallèles, il est nécessaire de faire des marquages avec un pas maximum de 1,20 m - des cintres pour les guides y seront fixés.
Si le plafond n'est pas centré, des lignes sont tracées parallèlement à n'importe quel long mur pièces à une distance de 1,20 mètre de celle-ci, également avec un pas de 1,20 m. Depuis le petit mur de la pièce pour accrocher sur toutes les longues lignes, nous marquons des points avec un pas maximum de 120 cm.
Étape n°3. Fixez les coins du mur
Il est très important que lors de l’installation, le grand bord du coin soit toujours adjacent au mur. Pour les relier dans les coins, on coupe les extrémités à quarante-cinq degrés, ou on les met bout à bout.

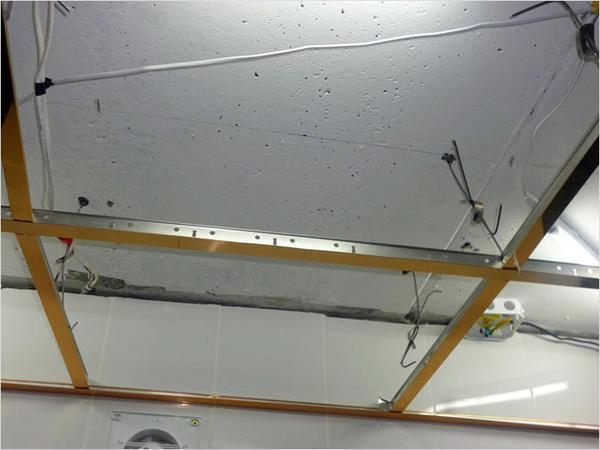
Important! Avant de commencer, vous devez d’abord terminer l’installation de tous les câbles, tuyaux et systèmes de ventilation.
Étape n°4. Installation des suspensions
Les suspensions sont fixées au plafond à l'aide d'une ancre à coin, strictement aux points préalablement marqués par incréments de 120 cm maximum.
Étape n°5. Installation du cadre
Les profilés principaux L3700 comportent des trous pour les crochets (il suffit de les accrocher) et des trous pour les serrures des profilés transversaux L1200. Le profilé principal à l'extrémité, qui repose sur le coin, doit être découpé avec des ciseaux métalliques avec la serrure de manière à ce que le trou pour la serrure du profilé transversal soit situé sous la marque dans laquelle le cintre est martelé. Gardez cela à l’œil pour que l’alignement du plafond ne s’égare pas.
Lorsque plusieurs profilés principaux sont installés parallèlement les uns aux autres, ils peuvent être fixés les uns aux autres à l'aide de profilés transversaux dont les verrous s'enclenchent dans les trous des guides. Le pas entre eux est de 60 cm. Selon le même principe, nous insérons du L600 dans les profilés transversaux. En conséquence, vous devriez obtenir un revêtement en acier avec des alvéoles de 60x60 cm.

Pour niveler le cadre en position horizontale, vous devez serrer ou desserrer les cintres à l'aide d'un ressort papillon.

Étape n°6. Installation des dalles de plafond
Les carreaux se salissent facilement, ils doivent donc être posés avec des mains ou des gants propres. Il est inséré dans le cadre en diagonale, déplié et la cellule est placée.

C'est tout installation du plafond suspendu Armstrong, instructions qui est décrit dans cet article. En le suivant, vous pourrez faire tout le travail vous-même !
Conseils utiles
Découpage de la dalle. Très souvent, lors de l'installation d'un plafond Armstrong, il peut être nécessaire de découper les dalles, car toutes les pièces ne sont pas des multiples de 60 cm. Les panneaux qui doivent être réduits pour correspondre à la taille des cellules sont découpés au couteau à peinture.
Poser la lampe. Si le plafond implique le placement de lampes, leur installation et leur connexion doivent commencer immédiatement après l'assemblage. cadre en acier- avant de poser les dalles. Pour ce faire, nous plaçons la lampe dans la rainure, après l'avoir préalablement connectée au réseau et installé des supports supplémentaires.

Les plafonds de type Armstrong sont très populaires. Ils sont largement utilisés en raison de leur faible coût et de leur durabilité. De plus, la pose d'un tel plafond est réalisée en dès que possible. Afin d'assembler correctement la structure de vos propres mains, vous devez suivre des règles simples et effectuer un marquage préliminaire.
Avant de commencer la pose des dalles, vous devez installer les rails de support. C'est assez facile à faire. L'essentiel est de choisir des lattes de la bonne taille.
Avant de commencer à installer les rails de support, vous devez sécuriser les cintres. Ces pièces sont nécessaires pour garantir que les lattes s'adaptent parfaitement à la surface et ne se déforment pas. Les suspensions doivent être fixées par incréments de 1,5 mètres.
Des informations sur les caractéristiques des plafonds suspendus Armstrong seront également utiles :
Lors de la fixation de la suspension, tenez compte d'un certain nombre de nuances :
- La tige avec l'œil doit être fixée au plafond à l'aide d'un ancrage. Si vous n'avez pas la possibilité d'utiliser cette pièce, utilisez une vis autotaraudeuse ordinaire.
- Assurez-vous de fixer une tige avec un crochet au rail de support.
- Assurez-vous de fixer un cintre à ressort. Cela vous aidera à ajuster la longueur de la structure.
Nous installons les plafonds suspendus Armstrong de nos propres mains
Technologie d'installation du cadre :
- Garniture profil de mur et fixez-le au mur. Pour fixer le produit, utilisez des chevilles et des vis. Si vous installez un plafond Armstrong dans maison en bois, vous pouvez alors fixer le profilé mural avec des clous.
- Ensuite, les profils de support sont installés.
- Installez des cintres. N'oubliez pas d'aligner les bandes de support après cette opération. Sinon, la structure pourrait s'effondrer.
- Fixez des liens longitudinaux et transversaux. Vous pouvez utiliser un schéma de montage en croix ou en parallèle.
Comment assembler un plafond suspendu Armstrong : instructions étape par étape
Après avoir assemblé le cadre, vous devez commencer à installer les dalles. Avant de procéder à cette opération, il est conseillé de s'assurer de la solidité de la charpente.
L'installation s'effectue dans l'ordre suivant :
- Affichez le contenu de chaque cellule une par une.
- Inclinez le contenu de la cellule et insérez-le dans l'espace inter-plafond. Ensuite, vous devez placer soigneusement la dalle dans la cellule. Assurez-vous que la fixation de chaque carreau est solide.
- Installez les lumières et connectez-les au câblage. Cela doit être fait après avoir débranché l'alimentation des fils.
- Installez des dalles aveugles.

Si vous envisagez d'installer des lampes raster ayant une grande densité spécifique, ils doivent être installés sur des suspensions individuelles. Sinon, il y aura une charge excessive sur le cadre du plafond.
Support de plafond suspendu de type Armstrong
La charge portante est placée sur un cadre constitué de profilés métalliques. Il a généralement une structure cellulaire, cependant, dans certains cas, le cadre est constitué exclusivement d'éléments longitudinaux.
Habituellement, une suspension en forme de U est fixée au plafond. La pièce a des trous spéciaux. Comme alternative, vous pouvez utiliser des cintres réglables. Ils permettent de régler la hauteur de chaque section séparément.

Le plafond de type Armstrong est fixé à l'aide de :
- Profils. Ils sont en métal. Les profils sont fixés à l'aide d'un verrou à ressort.
- Unités de fixation.
- Suspensions. Ils sont réglables en hauteur de bloc.
Réparation à faire soi-même de plafonds suspendus de type Armstrong
Réparation de plafond suspendu de type Armstrong – processus simple. Avant de commencer travaux de réparation, vous devez démonter la structure. Pour ce faire, vous aurez besoin d'une spatule, d'un couteau, d'un tournevis, d'une pince coupante et d'une pince.
Instructions pour démonter le plafond :
- Pliez le profil installé sur le dernier carreau aveugle. Pour ce faire, utilisez une pince coupante ou un tournevis.
- Retirez la dalle aveugle.
- Retirez les supports et les plaques restantes.
- Si nécessaire, retirez les profils de support et d'angle.

Après avoir démonté le plafond, vous pouvez commencer les travaux de réparation. Les plaques et fixations déformées doivent être remplacées. Si la cause de la déformation de la toile était une inondation, vous devez d'abord la démonter luminaires, et ensuite seulement démonter le plafond suspendu.
Installation au plafond Armstrong (vidéo)
Installer soi-même un plafond de type Armstrong est assez simple. L'essentiel est de marquer correctement le plafond et les murs avant de commencer le montage. Vous devez également vous occuper à l'avance de l'installation des communications et du câblage électrique. Pour fixer les composants, utilisez des chevilles et des vis. Lors de l'installation d'un plafond Armstrong dans une maison en bois, il est permis d'utiliser des clous.
Le plafond suspendu Armstrong a acquis une grande popularité dans la finition de la surface du plafond. Un large choix de textures différentes vous permet de les installer dans tout type de pièce.
Le plafond Armstrong a acquis une popularité particulière en raison de sa facilité d'installation et de son accès aux communications cachées. Ceci est particulièrement important dans les grands bureaux et espaces de travail.
Ce plafond suspendu tire son nom de l'entreprise qui fut la première à le vendre en Russie.
Après avoir lu cet article, vous apprendrez à assembler une structure de plafond Armstrong de vos propres mains, et la vidéo à la fin de l'article vous aidera à comprendre de nombreuses nuances de ce processus.
Type de plafonds Armstrong
Les plafonds Armstrong peuvent être divisés selon les matériaux de surface en :
- Fabriqué à partir de fibres minérales.
- Plâtre.
- Métal (rack, cassette, Grilyatto - mesh).
- En bois.
- Plastique.
- Designer (en miroir et verre).
Les modules peuvent également être divisés en :
- Classe économique– des panneaux fabriqués dans le matériau le plus simple et le moins cher. Convient aux pièces sans exigences particulières et conditions.
- Résistant à l'humidité– pour les pièces avec humidité élevée: couloirs, piscines, salles de bains.
- Acoustique– des panneaux à isolation phonique accrue.
- Hygiénique– utilisé à l’intérieur industrie alimentaire et les soins de santé. Leur composition est pleinement conforme aux normes sanitaires.
Leurs avantages :
- Praticité.
- Installation, réparation et remplacement faciles des zones endommagées.
- Belle apparence.
- Prix bas.
- Possibilité de cacher les tuyaux, les fils, la ventilation et d'encastrer les lampes.
Avantages des structures suspendues modulaires
Types de profils
Appareil structure du plafond Armstrong se compose d'un cadre suspendu en profilés métalliques. Des tuiles sont installées dans les alvéoles de la charpente.
Il existe plusieurs types de profilés pour plafonds suspendus modulaires.
Les porteurs mesurent 360 centimètres de long, qui sont divisés en T15 et T24.
Transversal - 60 et 120 centimètres de long, également divisés en T15 et T24.
Profilé de mur d'angle 19\24.
Taille de carrelage standard 595×595 millimètres. Il existe également des carreaux moins populaires 1190×595 millimètres.
Lors de l'installation d'un tel plafond, des lampes intégrées de taille 590×590 millimètres.
Sélection d'outils et de matériaux
Lors du choix d'un matériau pour un plafond suspendu modulaire, l'accent doit être mis sur la distance par rapport à la base. La hauteur de descente doit être suffisante pour masquer toutes les communications, ainsi que pour la libre pose des carrelages dans les cellules.
L'indentation minimale doit être de 15 centimètres pour une installation plus pratique des lampes raster.
Pour la suspension au plafond, des rayons suspendus avec ressorts sont utilisés. D'un côté, l'aiguille à tricoter a un coude en forme de chas et de l'autre, en forme de crochet. Deux rayons sont attachés l'un à l'autre "papillon"à l'aide d'un ressort.
Calcul des matériaux
Avant d’acheter du matériel, il est important de savoir quoi acheter et en quelle quantité. Nous allons maintenant vous expliquer comment calculer le plafond d'Armstrong.
Le profil porteur le plus populaire est le T24. Avant de commencer à compter le nombre de profils, faites dessin schématique plafond.
Pour chaque 10 mètres carrés plafond que vous devez acheter :
- 2.3 profils porteurs L3600
- 14.3 sections L1200
- 15,7 sections L600
De plus, lors du choix d'un carreau, vous devez prendre en compte son motif afin qu'il ne diffère pas.
Pour la fixation au plafond, vous aurez besoin de chevilles enfoncées de 6x40 ou 6x60 mm.

Outils requis
- Marteau
- Marteau
- Ciseaux en métal
- Pinces
- Niveau (laser ou hydro)
- Niveau en aluminium 2,5 mètres
- Traceur (fil à peindre), ruban à mesurer, crayon.
Installation
- Tout d'abord, il faut faire marquages au plafond. À l'aide d'un laser ou d'un niveau hydraulique, faites des marques autour du périmètre de la pièce et déterminez l'angle le plus bas. Ceci est fait pour que la distance entre le plafond et la base soit calculée à partir du point le plus bas de la pièce.
- La conception du système de plafond Armstrong nécessite une distance minimale par rapport à la base - 15 centimètres du coin inférieur de la pièce. Ceci est conçu pour faciliter l’installation des panneaux et des lumières.
Sur cette base, calculez la distance requise par rapport au plafond. Marquez ensuite l'indentation requise dans chaque coin avec un crayon. Ensuite, connectez tous les points en série avec du fil à peindre.
- Fixez des coins muraux 19\24 autour du périmètre de la pièce. Le côté le plus grand du coin doit être du côté du mur. Pour les raccordements dans les coins de la pièce, coupez les bords des profilés à l'aide de cisailles à ferblantier à un angle de 45 degrés.

Faites attention! Avant de réaliser un tel plafond, vous devez préalablement poser tous les fils, ventilations et tuyaux, sinon il sera difficile de le faire plus tard.
- Vous devez maintenant trouver le centre de la pièce ; pour ce faire, mesurez les côtés du plafond et marquez le milieu.
Les côtés opposés doivent être connectés fil à peindre. L'intersection de deux fils sera le milieu de la pièce. Le plus petit des filetages servira de guide pour la fixation du profilé de guidage mural T24.
A gauche et côté droit Il est nécessaire de marquer des lignes parallèles à partir du guide à une distance de 120 centimètres les unes des autres.
Relativement parlant, le point central servira de lieu de montage à la suspension. À partir de là, sur des lignes parallèles des profilés de guidage espacés de 90 centimètres, vous devez marquer les points le long desquels les cintres iront pour fixer les profilés de guidage restants.
Installation de cintres et de profilés de guidage

Conseil! Lors de l'installation des cintres, ils ne doivent pas être plus bas que les coins du périmètre de la pièce. Si l'aiguille à tricoter s'avère plus longue, elle doit être coupée avec une meuleuse et chanfreinée pour qu'elle s'insère dans le ressort. Pour plus de commodité, il est recommandé de tourner tous les crochets dans une direction. Les rayons sont fixés au plafond à l'aide de clous à cheville.
Après avoir fixé tous les supports nécessaires au plafond, vous pouvez commencer à assembler le cadre de suspension.
- La première étape consiste à installer les profils de guidage. Profils L3600 et L1200 Ils ont des trous prêts à l'emploi pour être montés sur des cintres ; ils sont simplement accrochés aux aiguilles à tricoter.
Les bords doivent reposer sur le coin le long du mur. Le profil est nivelé horizontalement à l'aide d'un ressort papillon.

Conseil! Si la longueur du profilé de guidage n'est pas suffisante, vous devez alors mesurer la distance requise et couper un morceau du profilé avec des ciseaux métalliques. Les profils sont reliés entre eux à l'aide de verrous aux extrémités.

- Une fois que vous avez assemblé plusieurs guides, ils peuvent être connectés entre eux avec des profils L1200. Ils sont connectés à l'aide de verrous intégrés et de fentes aux extrémités.
La distance entre les profils transversaux doit être 60 centimètres.

- Une fois la structure des profils L1200 prête, nous utilisons le même principe pour les connecter aux profils L600. Aux endroits où il est prévu d'installer des lampes, vous devez réaliser une suspension supplémentaire.
- Sur tout le périmètre du cadre, là où le profilé transversal n'atteint pas le mur, il est nécessaire de mesurer la distance et de couper les parties nécessaires avec des ciseaux métalliques.
- Si tous les profilés de guidage sont installés horizontalement, les profilés transversaux seront dans la même position. En conséquence, vous devriez obtenir cadre en métal avec des cellules de 60x60 centimètres.
- Pour une explication plus visuelle, regardez la vidéo expliquant comment réaliser un plafond Armstrong.
Pose de carrelage et installation de lampes
Le cadre est prêt et nous devons maintenant passer à la dernière étape : y installer des carreaux et des lampes. Cela ne doit être fait que lorsque l'humidité de la pièce est inférieure à 70 %.
Vous devez d’abord installer des lampes raster.

Ensuite, nous posons le carreau lui-même. Comme il se salit très facilement et que sa composition peut provoquer des irritations cutanées, il est préférable de le faire dans gants en caoutchouc. Si vous avez acheté un carreau avec un motif, suivez séquence correcte lors de son installation.
Il n’est pas nécessaire de poser du carrelage aux endroits où vous avez installé la lampe. Aux endroits où la taille des alvéoles n'est pas pleine, il est nécessaire de couper les carreaux avec un couteau.
Si un carreau devient inutilisable, il peut être facilement remplacé.
Conseil! Cachez les carreaux de rechange sous le plafond afin de pouvoir les utiliser lors de leur remplacement et de ne jamais les perdre.
C'est ça! Votre plafond est prêt. Vous savez maintenant que l'installation du système de plafond Armstrong n'est pas aussi difficile qu'il y paraît à première vue. En le faisant vous-même, vous économiserez pas mal d'argent, car le prix de son installation dépasse le prix du matériau lui-même. Et cette vidéo vous aidera dans cette affaire !
Le plafond Armstrong est utilisé pour la finition des plafonds dans les zones de vente et locaux de bureaux. Il est beau, s’installe rapidement et est peu coûteux. Examinons de plus près l'installation des plafonds Armstrong.
Système de suspension Armstrong
Plafond suspendu permet de cacher systèmes d'ingénierie. Tous les éléments du système sont constitués d'alliages de métaux légers (principalement de l'aluminium), la charge sur les sols est donc minime.
La charpente suspendue est composée de plusieurs types de profilés :
- Porteurs. Longueur 3,6 m, types T15 et T24 (détermine la largeur du profil).
- Transversal. Longueur 0,6 et 1,2 m, types T15 et T24.
- Profilé mural d'angle 19/24.
La finition elle-même est en carrelage. Ils existent en deux tailles : 595x595 mm et double 1190x595 mm. La deuxième option est moins populaire en raison de sa forme rectangulaire.
Des rayons spéciaux à ressort sont utilisés comme fixations pour maintenir les profilés suspendus, à l'aide desquels vous pouvez modifier la hauteur d'installation du cadre. Le réglage de la longueur des rayons permet d'aligner le plafond dans un plan horizontal.
Un rayon est un élément double composé de trois parties :
- une aiguille à tricoter avec un chas à une extrémité ;
- aiguille à tricoter avec un crochet au bout;
- printemps papillon.
Le premier élément est fixé au plafond à l'aide d'ancrages. Le profil est mis sur le deuxième. Le ressort peut être utilisé pour régler la hauteur d'installation du cadre.

Options de finition
Les plafonds sous la marque Armstrong sont divisés en plusieurs classes :

Installation
Dans la plupart des cas, l'installation est réalisée par des entreprises qui vendent des systèmes de suspension, et ce service est déjà inclus dans le prix du plafond. Mais parfois, vous devez effectuer l'installation vous-même ou superviser le travail des installateurs.
L'installation d'Armstrong n'est pas recommandée dans les pièces dont l'humidité est supérieure à 70 %.
Préparation
Définir point de départ installations. Pour ce faire, mesurez chaque coin de la pièce et choisissez le plus petit en hauteur. Il est conseillé d'effectuer cette étape après avoir nivelé le sol.
Mesurez à partir du coin le plus bas du mur jusqu'à une taille qui correspondra à la distance entre le plafond de base et la structure suspendue. La distance minimale de la base est de 15 cm. S'il y a des communications cachées sous le plafond, cette taille est prise en compte à partir du bord inférieur des communications (par exemple, depuis le conduit de ventilation).
Marquez les trois autres coins de la pièce au même niveau que le premier. Cela se fait à l'aide d'un laser ou d'un niveau d'eau.
Faire ligne droite selon le marquage, utiliser un cordon de peinture (coupe-cordon). Il s'agit d'un fil spécial avec de la peinture, qui est tiré le long des marques entre deux points et plié de manière à rebondir et à laisser une empreinte directe sur le mur. 
Vous devez maintenant déterminer l'emplacement de fixation des cintres et des profilés.
- Déterminez le centre de la pièce. Pour ce faire, tracez des lignes diagonales. Le point d'intersection est le centre de la pièce.
- Tracez une ligne à travers la pièce passant par le centre résultant.
- Tous les 120 cm du centre dans des directions différentes, tracez des lignes le long desquelles les profilés de guidage seront montés.
- Placez des points le long des lignes tous les 120 cm ; ce sont les emplacements d'installation des cintres. Le point central est pris comme point de départ de la mesure.

Installation de cintres et de profilés
Tout d'abord, le profilé mural est fixé.
Le profilé est appliqué au mur avec une large étagère. La fixation se fait à travers des trous prêts à l'emploi avec des vis autotaraudeuses, qui sont fixées au mur à l'aide de chevilles en plastique préinstallées.
À l'aide des marques au plafond, des trous sont percés pour les ancrages et des cintres (rayons) y sont fixés. Pour simplifier l'installation, tous les crochets au bout de l'aiguille à tricoter tournent dans un sens.
Tout est maintenant prêt pour assembler le cadre. Les guides comportent des trous traversants préfabriqués dans lesquels le crochet est engagé. Les bords des profilés sont posés sur les profilés muraux.

La distance entre les barres transversales est de 60 cm.
Les emplacements d'installation des lampes sont renforcés par l'installation d'une suspension et d'une barre transversale supplémentaires.

Sous le plafond il y a conception finie le cadre, qui est un lattage en forme d'alvéoles mesurant 60x60 cm. Les dalles Armstrong sont un matériau assez peu salissant, il est donc préférable de travailler avec des gants.
Insérez le carreau dans la cellule en diagonale avec le bord vers le haut, tournez-le horizontalement et abaissez-le à l'emplacement d'installation. Faites attention à la coïncidence du motif avec d'autres éléments. 
Si nécessaire, les carreaux sont découpés au couteau.
La conception des plafonds suspendus Armstrong est très simple et bien pensée pour une installation rapide. Cela vous permet de à court terme finir les plafonds grande surface, quelle que soit la qualité de la fondation. Nous recommandons de laisser quelques tuiles de rechange en cas de remplacement ; elles peuvent être cachées à l'intérieur de la structure.
Installation du plafond suspendu Armstrong : principaux paramètres
Aujourd'hui, les plafonds suspendus Armstrong deviennent de plus en plus populaires, principalement en raison de installation facile, car il peut être installé dans des bâtiments industriels, en zones de vente au détail, ainsi que lors de la décoration de locaux d'habitation standards.
La principale caractéristique de la conception est la simplicité et la concision, grâce auxquelles le type Armstrong s'intégrera universellement dans n'importe quel décor de bâtiment. De plus, étant donné leur coût relativement bas et la variété d'un riche assortiment de détails décoratifs, de tels plafonds trouvent un grand écho parmi les demandes toujours croissantes. plus acheteurs.
Avant de répondre à la question : comment installer un plafond suspendu Armstrong, il semble opportun de caractériser les caractéristiques de la structure elle-même. L'équipement principal d'Armstrong est constitué de cassettes légères créées à base de fibre minérale, atteignant une épaisseur de 20 mm. Ces cassettes sont fixées à l'aide de guides métalliques, qui sont ainsi assemblés en une sorte de structure suspendue, fixé au plafond à l'aide d'un fil de 2 mm de diamètre.
Cette conception est considérée comme ouverte, puisque système de suspension ne se cache pas intentionnellement et fait partie de conception décorative plafond. En règle générale, la taille des cassettes varie du rectangulaire (taille 600x1200) au carré (taille 600x600, respectivement). Quant au revêtement supplémentaire, vous pouvez choisir un revêtement régulier ou résistant à l'humidité, dernière option le plus approprié pour un placement dans les cuisines ou les salles de bains, car il fournit une isolation supplémentaire contre l'humidité (lire : ""). En règle générale, les entreprises manufacturières fournissent images visuelles ou des photos de cassettes décoratives, qui vous permettent d'installer un plafond suspendu de la plus haute qualité, dont la technologie d'installation peut répondre à toutes les exigences des clients les plus exigeants.
Grâce à spécifications techniques l'installation d'un plafond suspendu Armstrong permet de :
- Cachez une variété de moyens de communication, de la ventilation aux fils et câbles informatiques, ce qui, à son tour, n'empêche pas l'accès aux systèmes cachés.
- Installer systèmes de protection incendie et grilles d'aération.
- Installez des lampes et des lustres.
- Créez un système totalement indépendant du plafond principal, du parfaitement lisse au décoratif.
- Garantir la résistance au feu, ainsi qu'assurer l'isolation phonique et thermique, obtenue grâce à l'utilisation de diverses surfaces et les revêtements, dont les plus populaires sont les cassettes divisées en cellules, ou structures perforées.

Technologie d'installation au plafond Armstrong et principales capacités de conception :
- Distance illimitée par rapport au plafond principal, ce qui permet d'installer un système de ventilation et de climatisation dans l'espace résultant entre les plafonds (lire : " ").
- Accès rapide aux communications sous-plafond (ce qui n'est pas possible lors de l'installation d'autres types de plafonds)
- Large gamme pièces connexes (halogènes et Lampes LED tirer et systèmes de ventilation)
- Facilité de transformation, puisque pour changer une pièce, il faut mettre en place la cassette en fibres minérales.
Installation du plafond Armstrong, regardez la vidéo :
Instructions d'installation du plafond Armstrong
Première étape : le marquage
Comme pour l'installation de n'importe quel plafond, l'installation des plafonds suspendus Armstrong doit commencer par un marquage. Après avoir déterminé la distance requise pour les communications cachées, une marque est apposée sur le mur (plus de détails : " "). À ce stade, il est important d'envisager la possibilité de masquer toutes les parties saillantes de la structure du sous-plafond et des communications.

Sur la base du point de référence déjà marqué sur le mur, il est nécessaire de le transférer sur d'autres murs et, en reliant les points du mur, de tracer des lignes. Afin de rendre le plafond uniforme et indépendant de la surface principale du plafond de base, vous pouvez effectuer un marquage à l'aide d'un laser ou d'un niveau d'eau.
Deuxième étape : installation des profils
La technologie d'installation d'un plafond suspendu Armstrong dans un deuxième temps consiste à fixer des profilés en forme de L aux lignes déjà marquées sur les murs. Pour la découpe de profilés la bonne taille Une scie à métaux à dents fines standard fera l'affaire. Et pour les joints d'angle, utilisez du millepertuis ou un rapporteur.

A ce stade, le schéma d'installation du plafond suspendu Armstrong implique également l'installation de guides. En règle générale, ils ont le même en forme de T, mais peut varier en longueur : les parties longues ont des fentes dans lesquelles sont insérés des profils courts saillants. En conséquence, une cellule rectangulaire ou carrée est créée, avec une taille adaptée à la cassette.
Pour une précision et une exactitude maximales, la structure commence à être assemblée à partir du centre, car les cellules situées près des murs seront très probablement différentes de celles situées au centre et devront être raccourcies.
Troisième étape : pose des suspensions
Le schéma d'installation au plafond Armstrong à la troisième étape consiste à suspendre des guides à l'aide de cintres spécialisés. Mince tiges métalliques sont enfilés à travers une plaque spécialement incurvée (pétale).
Si le pétale n'est pas utilisé, une technologie alternative pour installer le plafond Armstrong peut également consister à créer des fixations à l'aide de fil épais. Redressé à l'avance, afin de minimiser la déformation due à la charge structurelle, il est fixé à des profilés à trois boucles ou plus.

Quant à la fixation de la structure à la base surface du plafond, alors les ancres entrent en jeu ici. Ils ont un crochet ou un anneau sur lequel sont fixés les cintres. Leur taille dépend du type de matériau de fixation ; par conséquent, des chevilles et des vis peuvent être utilisées.
Tout d'abord, des guides longs sont installés, puis ils sont connectés à des guides courts. Le treillis finalement assemblé doit être nivelé horizontalement ; dans ce cas, il est nécessaire de recourir à l'aide d'un niveau. La taille est ajustée en changeant la position des pétales ou en ajustant le fil. De plus, après un certain nombre de jours, le système doit être à nouveau ajusté, en raison de l'affaissement possible du plafond sous la charge de l'ensemble de la structure.
Ensuite, les cassettes Armstrong sont installées dans le treillis assemblé, ainsi que les pièces supplémentaires, elles sont insérées dans les étagères créées par le cadre.