
Table en verre DIY pour la cuisine. Comment faire une table en verre
Tout d’abord, décidez vous-même du type de table que vous souhaitez réaliser. Cela peut être une table à manger, une table de chevet ou une table de nuit, ou peut-être une table basse. Dans notre cas, nous réaliserons une petite table d'appoint pour le salon.
Il est préférable d'effectuer tous les travaux de fabrication ultérieurs dans la cour ou sur un terrain à côté de la maison.
Examinez attentivement votre vase de sol, ses dimensions doivent être d'au moins 40 à 45 centimètres de hauteur et environ 80 à 90 centimètres de diamètre.
Dans tous les cas, dans chaque supermarché, vous pouvez facilement sélectionner un produit qui répond pleinement aux exigences nécessaires. Votre vase peut être fabriqué en argile, en pierre, en céramique, en béton ou en plastique. Cependant, si vous aimez un vase en plastique, vous devrez y ajouter du gravier ou des galets marins pour lui donner de la stabilité. Et si le vase est transparent, vous donnerez au socle un aspect plutôt original et coloré.
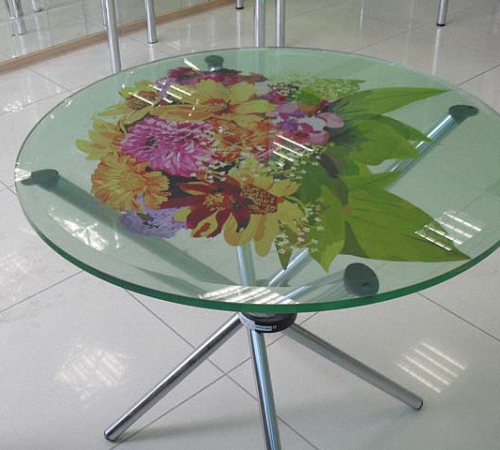
Dans notre cas, nous utilisons rond verre trempé au moins 12 mm d'épaisseur et environ 110 à 115 centimètres de diamètre. Vous pouvez acheter du verre d'usine de marque ou chercher, par exemple, dans le garage des morceaux de verre qui ne sont plus nécessaires depuis longtemps, mais qui conviennent parfaitement à vos besoins. Vous pouvez apporter cette pièce dans un atelier, où des ouvriers la découperont pour vous, ou essayer de vous acquitter de cette tâche vous-même. Demandez ensuite aux artisans d'arrondir le bord du plateau sur un ou deux côtés, selon votre envie.
Quel verre convient le mieux à une table ?
En principe, presque tout convient pour réaliser une table. espèce connue verre:
- Enfumé,
- Transparent,
- Teinté,
- Mat,
- Verre coloré qui se marie bien avec intérieur commun chambres.
Quelles sont les règles de sécurité lors du travail du verre ?
Bien sûr, lorsque l'on travaille avec un tel matériau complexe, comme le verre, il est important que vous ne vous blessiez pas ou ne nuisiez pas à votre santé.
Si vous décidez de travailler vous-même le verre et de le couper avec un coupe-verre, veillez à utiliser des lunettes de sécurité et à porter des gants de travail épais.
Lorsque vous transportez du verre depuis un magasin, assurez-vous qu'il est de la bonne manière emballé, toujours avec des coussinets en mousse inclus. Ils protégeront le verre de la casse lors des secousses dans la voiture.
Comment se déroule le processus de fabrication proprement dit ?
Placez le vase de sol au centre du coin salon de votre salon. Il peut être placé près du canapé ou non loin des chaises longues, en un mot - dans n'importe quel endroit qui vous convient.
Placez le plateau fini sur le support et ajustez sa position pour qu'il se trouve exactement au milieu. Après cela, mettez-le de côté et appliquez de la colle silicone transparente. Répartissez la colle uniformément sur le col de votre vase, en l'appliquant en boules rondes, il doit y en avoir au moins six.
Placez ensuite le plateau selon vos repères. Pour que les zones de collage « collent », placez quelque chose de lourd sur le verre au centre. Laissez la colle sécher complètement avant d'utiliser la table.
Vous pouvez mettre des éclats de verre au fond du vase et l'éclairer, comme une guirlande de Noël. Puis la nuit la guirlande illuminera les fragments qui, avec leurs reflets à travers le plateau en verre, créeront une atmosphère mystérieuse dans votre salon.
Table en verre – excellent solution de conception. Léger et gracieux, il impressionnant aspect, s'intègre parfaitement dans n'importe quel intérieur, ne raye pas et ne se casse pas.
Soins derrière un tel meuble simple: assez opportun frotter avec un chiffon humide ou une solution spéciale.
Mais peut-être la chose la plus importante avantage table en verre, c'est qu'elle est complètement ne surcharge pas intérieur, mais, au contraire, semble y ajouter air et l'espace.
Options de tables en verre
Depuis verre faire cuisine et même
Les tableaux peuvent être complètement verre Et combiné avec d'autres matériaux (bois, plastique, pierre, métal, rotin, etc.), avec encadré et plateau de table sans cadre et sous la table
De plus, des tables en verre varier selon ce qui suit signes :
1. Géométrie du plateau :
- ovale;
- rond;
- carré;
- rectangulaire;
- triangulaire;
- forme irrégulière.


2. Verre utilisé :
- triplex;
- verre trempé;
- verre teinté;
- verre dépoli;
- verre ordinaire (brut).

3. Conception :
- table coulissante;
- table mobile;
- table avec étagère sous le plateau ;
- table avec un plateau monolithique et autres.


Avantages et inconvénients des tables en verre
 La table en verre a une rangée avantages :
- Esthétique apparence. Cette table décorera n'importe quel intérieur.
- Hygiène. Ils n'absorbent pas les odeurs et la saleté et n'émettent pas de substances nocives.
- Praticité. Essuyez simplement le dessus de la table moyens spéciaux ou de l'eau.
- Sécurité. La résistance de certains types de verre peut être comparée à celle du bois. Et si le verre se brise, il conserve la même forme grâce à un film spécial.
- Persistance. Certains types de verre résistent aux températures élevées, à l'humidité et à diverses influences chimiques.
Défauts tables en verre :
- En essuyant mal le comptoir, vous pouvez obtenir divorces sur la surface.
- Fort les objets sont placés.
- Le verre ordinaire se salit rapidement empreintes digitales.
- Surface en verre ordinaire les rayures, peut apparaître puces.
- Une table en verre ordinaire peut accident.
- Haut prix pour les produits finis en verre.
Matériaux et outils
 Matériels, nécessaire pour réaliser une table en verre :
- feuille verreépaisseur 6-12 mm;
- nettoyage nettoyant pour vitres;
- colle pour le verre et autres matériaux ;
- de l'essence ou acétone;
- émeri papier à grain grossier et fin;
- jambes pour la table (4 tubes métalliques) ;
- des drageons pour les pieds de table ;
- légume huile(pour mouiller la molette du coupe-verre) ;
- feuille d'aggloméré ou contre-plaqué, sur quel verre sera coupé ;
- coller pour polir le verre.
 Outils:
- crayon, brillant marqueur;
- longue règle roulette;
- coupe-verre diamanté;
- marteau en caoutchouc pour battre les bords (vous pouvez utiliser un coupe-verre à la place) ;
- faire le ménage chiffon – 2 pièces;
- percer ou bulgare;
- cercle de feutre.
Attention: Lorsque vous travaillez avec du verre, veillez à utiliser des lunettes de protection, des gants de protection et des mitaines.
Table haute technologie
 Formulaire votre future table peut être n'importe quoi. Faire supplémentaireétagères ou se limiter à un seul plateau dépend également de l’intention de l’auteur.
Considérons le général principe de fabrication table en verre avec pieds en métal.
Choisir verre nécessaire en raison de ses propriétés. Meilleur ajustement triplex ou en verre trempé.
L'épaisseur du plateau ne doit pas être inférieure à 6 mm ni supérieure à 12 mm. Optimal Un verre épais serait une option 8 mm.
Étapes de fabrication
Étape 1. Pour commencer préparation tous les outils et soigneusement mon verre des deux côtés.
Étape 2. Si bord Le verre est inégal - nous le coupons. Pour long côtés, nous utilisons une règle et un marqueur, avec lesquels nous marquons le souhaité trajectoire coupe-verre

Lors de la coupe au rouleau coupe-verre pré-mouillez le rouleau huile La pression doit être d'environ 2 kilogrammes. Si ça n'a pas marché incision la première fois, vous pouvez déplacer le coupe-verre plusieurs fois d'avant en arrière. Après avoir effectué la coupe, vous devez taper sur le côté avant de la garniture. caoutchouc avec un marteau (ou tout autre objet en caoutchouc lourd).

À coupe en utilisant un coupe-verre diamanté, vous devez vous rappeler qu'une forte pression est inappropriée. Il faut passer un coupe-verre sur le verre une fois. Après avoir fait l'incision diamant un coupe-verre est nécessaire combiner le bord de la table ou de la feuille avec le bord du plateau dont nous avons besoin (pour que les chutes pendent) et soigneusement frappe Par à l'intérieur verre
Puis, en tenant le bord de la garniture, pointuéloigne-le de toi. Les parties étroites restantes ou pas tombé Le verre restant est brisé à l'aide d'un coupe-verre. Il doit avoir un spécial fente, qui capture les petites particules de verre.
Pour couper le verre avec inégal un échantillon est pré-dessiné sur papier avec le bord. A l'aide d'un coupe-verre on trace le dessin modèle - bord irrégulier prêt.

Pour couper le verre en cercle le centre est marqué (deux croix croisées). DANS milieu un morceau de verre est attaché avec un fil ou corde,à la partie opposée de laquelle est fixé un coupe-verre. Réalisé cercle. Ensuite, à partir des bords du cercle, les lignes restantes des deux croix sont tracées jusqu'à bords morceau de verre. Le résultat est du soleil.

Soigneusement, un segment du soleil est supprimé passementerie verre

Étape 3. A l'aide d'une perceuse, semelle sur la perceuse et papier de verre, collé dessus ruban adhésif double face, polissage les bords de notre table. Nous broyons les bords du verre de tous les côtés (en bas, au milieu et en haut).
Important: Le broyage doit être effectué à basse vitesse (pas plus de 1 700 tr/min) pour éviter la surchauffe du verre.
Étape 4. Remplacez le cercle de papier de verre par feutre cercle, graissé avec une pâte spéciale, et effectuez les mêmes manipulations. A basse vitesse passons le long des bords du verre de tous les côtés. Polissage produit.
 Schéma de connexion pour plateau de table en verre et support.
Les tables en verre conviennent à tous les intérieurs. Leur gracieux et aéré apparence ne surcharge pas l'espace, laissant visuellement la pièce spacieuse et épurée. A partir d'un matériau tel que le verre, vous pouvez réaliser une table de desserte, de café, d'ordinateur ou même de salle à manger, et il est tout à fait possible de réaliser la structure soi-même.
Ces objets d'intérieur varient en forme, en design et en matériaux. Quant à la géométrie du plateau, une table en verre peut être :
- rond;
- rectangulaire;
- triangulaire;
- carré;
- ovale;
- ont une forme bouclée inhabituelle.
Selon caractéristiques de conception, il existe les types de tableaux suivants :
- transformateur;
- table avec étagère inférieure ;
- table coulissante;
- structure mobile;
- table monolithique et autres.
De tels meubles peuvent également être fabriqués à partir de différents types verre Par exemple, une table basse peut être réalisée en verre noir, trempé, teinté, dépoli, transparent ou en triplex.
Non seulement les plateaux de table, mais aussi le piètement et les pieds des structures se distinguent par une variété de designs. Les options les plus courantes sont des matériaux tels que le bois ou le métal chromé. Les tables forgées en verre sont très riches et élégantes et sont choisies pour les intérieurs style classique. Une table en rotin avec verre semble plus simple, mais s'intègre bien dans la plupart des designs.
Avantages et inconvénients des structures en verre
À qualités positives les tables en verre comprennent les éléments suivants :
- beauté, propreté, légèreté d'apparence;
- la possibilité d'intégrer un tel meuble dans presque n'importe quel design ;
- facilité d'entretien, hygiène, respect de l'environnement;
- force suffisante;
- résistance aux environnements chimiques, à l’humidité et conditions de température environnement.
Parmi les inconvénients des tables en verre figurent les caractéristiques suivantes :
- Il y a souvent des taches sur le verre dues à l'eau ou à des produits d'entretien mal choisis ;
- mauvaise qualité ou matériel bon marché se gratte rapidement;
- les empreintes digitales restent souvent sur le verre ;
- s'il est manipulé avec négligence, vous pouvez avoir des fissures et des éclats, voire même casser la table ;
- les structures toutes faites ne sont pas bon marché.

Fabriquer une table en verre de vos propres mains
Étape préparatoire
Ayant décidé de faire table en verre vous-même, vous avez probablement décidé à l'avance de son emplacement et de son rôle. En fonction de l'endroit où ce meuble sera placé et de la fonction qu'il remplira, vous devez réaliser un croquis préliminaire sur papier, en tenant compte des caractéristiques de la pièce dans laquelle vous placerez la table. Sur le croquis, vous devez indiquer la zone du plateau et l'emplacement des pieds.
Pour fabriquer une table en verre, préparez le matériel et les outils suivants :
- épaisseur de verre de 6 à 12 mm ;
- colle spéciale pour verre;
- agent de nettoyage;
- acétone;
- lime ou bloc d'émeri ;
- pieds pour la structure;
- ventouses pour jambes;
- huile de tournesol;
- du contreplaqué ou des panneaux de particules sur lesquels vous découperez du verre ;
- pâte à polir pour matériaux;
- marqueur ou feutre;
- règle et ruban à mesurer ;
- coupe-verre;
- marteau à tête en caoutchouc;
- chiffons;
- lunettes et gants de sécurité;
- broyeur avec une meule.
Lorsque vous travaillez, vous devez utiliser uniquement du verre propre et sec, exempt de poussière et d'autres contaminants, même les plus petits. Vous pouvez nettoyer le matériau avec une solution simple bicarbonate de soudeà l'aide d'un chiffon doux. Si le verre reste sale, il risque de se détacher de la ligne de coupe.
La façon la plus pratique de couper le verre est grande feuille contreplaqué ou aggloméré, et le matériau doit être en contact avec la table avec pratiquement aucun espace et pressé aussi étroitement que possible.
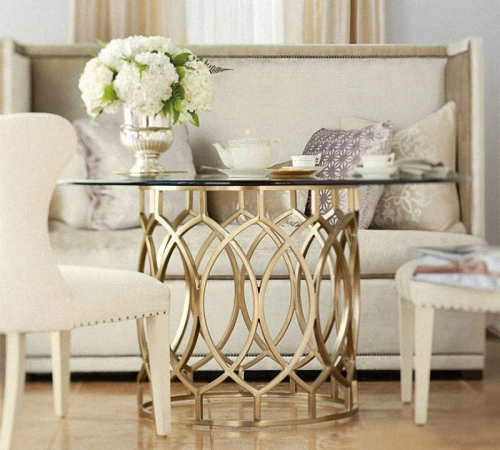
Table basse en verre et métal, photo :


Caractéristiques de la découpe du verre
Il est plus pratique de couper le verre à l'aide d'une règle métallique fine et longue, ou vous pouvez tracer au préalable une ligne avec un feutre afin de pouvoir ensuite la suivre avec un coupe-verre. Si vous êtes nouveau dans ce métier, il est préférable de vous entraîner sur un morceau de verre inutile et de commencer ensuite seulement à créer une table.
Attention, il est conseillé de compléter le trait que vous tracerez avec un coupe-verre en une seule fois, et pour que l'outil puisse travailler plus facilement et mieux glisser, sa molette doit être lubrifiée avec de l'huile végétale. Lorsque vous travaillez avec un coupe-verre diamanté, une ligne très fine et presque invisible reste sur le matériau. En plaçant le verre au bord de la table de manière à ce que cette ligne coïncide avec celle-ci, le matériau est brisé le long de la ligne de coupe. La force de pression doit être d'environ 2 kg. Lorsque vous brisez du verre, veillez à porter des gants de protection pour ne pas vous couper les mains et vos yeux doivent être protégés avec des lunettes.
Après avoir cassé la partie principale du verre, des saillies pointues ou des morceaux supplémentaires peuvent rester sur la coupe. Vous pouvez les retirer avec des pinces et porter des tampons en caoutchouc spéciaux. S'il n'y a pas de telles doublures, utilisez du papier plié en plusieurs couches.
Le verre est coupé à partir du bord le plus éloigné, en appliquant une pression assez forte sur le coupe-verre. Si vous travaillez avec un outil tranchant mais que vous ne parvenez pas à couper, lubrifiez le disque avec du kérosène et tracez plusieurs fois le long de la même ligne. Si vous n'êtes pas sûr que la coupe soit à la bonne profondeur, retournez le verre et recommencez la procédure.
Si vous fabriquez une table basse ronde avec du verre ou si vous travaillez avec d'autres formes courbes complexes, il est plus simple d'utiliser un pochoir pour plus de commodité. Après avoir découpé le cercle selon le pochoir, dessinez des rayons avec un coupe-verre et cassez le verre morceau par morceau.
Le verre armé est découpé d'une manière spéciale. Tout d'abord, un coupe-verre est utilisé le long du côté lisse, puis, à l'aide d'un outil tranchant, un creux profond est gratté jusqu'au maillage. Après cela, le verre est retourné et cassé le long de la ligne de coupe. Le maillage est mordu ou coupé.
Traitement sur table
Couper le long d'une ligne de fracture laisse souvent des bords tranchants sur le verre qui doivent être retirés. En production, le traitement final est effectué sur des machines spéciales, mais à la maison, des outils improvisés peuvent être utilisés dans un but similaire. Attention, pour ce type de travaux vous devrez également protéger vos mains avec des gants ou des mitaines en coton épais.
Vous pouvez nettoyer les zones coupées avec une lime ou une bloc d'émeri. Lors des manipulations, la lime doit être périodiquement humidifiée dans de la térébenthine ou du kérosène. Lorsque vous travaillez avec du verre fin, vous devez être très prudent.
L'étape suivante consiste à polir les extrémités, pour lesquelles une meuleuse avec une meule est utilisée. La vitesse du broyeur doit être faible et comprise entre 1 200 et 1 700 tr/min afin que le verre ne surchauffe pas. La première étape consiste à utiliser du papier à grain grossier, puis à le remplacer par un papier plus fin, et comme étape finale, vous pouvez poncer les extrémités du papier lui-même. papier à grain fin. Pendant le fonctionnement, le verre peut être humidifié avec de l'eau. Vous pouvez obtenir une douceur supplémentaire à l'aide d'une meule en feutre ou d'une pâte à polir spéciale pour verre.
Pour rendre le plateau plus attrayant et inhabituel, il existe plusieurs façons de décorer le verre. Les méthodes suivantes sont souvent utilisées :
- découpage;
- gravure sur verre;
- sablage;
- tonifiant;
- impression d'images;
- appliquer un motif de vitrail ;
- l'utilisation de double verre avec une couche décorative de fleurs, pierres, coquillages, grains de café et autres éléments.
Découpage et peinture sur vitrail Ils sont fabriqués à partir du « mauvais côté » du plateau afin que la structure ne soit pas endommagée lors de l'utilisation. En plus des méthodes décrites ci-dessus, une table en verre peut être décorée d'un éclairage décoratif, ce qui est très impressionnant, surtout la nuit.

Fixation des jambes
Avant d'installer les pieds, il est nécessaire de faire un trou dans chacun d'eux du côté de l'extrémité. Ces trous sont nécessaires pour y fixer des ventouses spéciales. Pour une plus grande solidité, les ventouses sont posées sur de la colle.
Pendant que la colle sèche, marquez sur le plateau avec un marqueur les endroits où les pieds seront fixés. Dans ces zones, il est nécessaire de dégraisser la surface avec de l'acétone ou de l'essence.
Quant à la colle, lors de la fabrication d'une table en verre, il est déconseillé d'utiliser la composition utilisée pour les miroirs, car elle met beaucoup de temps à sécher et est visible à travers la surface transparente. Pour une table en verre, il est préférable d'acheter de la colle spéciale de haute qualité. Sur marché russe Vous pouvez trouver 2 variétés populaires de ces matériaux : les compositions verre-verre et verre-métal. Pour polymériser une telle colle, elle doit être exposée à une lampe ultraviolette.
Les pieds sont collés un à un à la table. Tout d'abord, lubrifiez l'élément, placez-le à un endroit pré-marqué, attendez environ 30 à 60 secondes, puis dirigez-le lampe ultraviolette sur cette zone et laisser agir jusqu'à ce que la composition soit complètement polymérisée.
Puisqu'il sera impossible de retirer les pattes une fois la colle complètement durcie, les endroits où elles sont fixées doivent être marqués très soigneusement.

Table basse en verre nécessite conditions particulières opération. Tout d'abord, nous notons qu'il faut le manipuler avec précaution, en essayant de ne pas casser le plateau. Prendre soin d'une telle table n'est pas difficile, il suffit d'essuyer le verre de temps en temps avec un chiffon doux ou un morceau de microfibre utilisant un nettoyant pour vitres.
Des rayures apparaissent parfois sur la table en verre. Une pâte spéciale GOI aidera à corriger un tel défaut. Il est broyé jusqu'à l'état de miettes très fines, appliqué sur un morceau de coton, un bâton ou un coton-tige, puis la surface endommagée est polie. Il n’est pas nécessaire d’exercer une forte pression. La rayure est traitée pendant 15 secondes, puis la pâte est lavée et la procédure est répétée. Dans certains cas, le nombre d'approches peut être important.
Il existe d'autres moyens d'éliminer ou de masquer les rayures sur le verre. Vous pouvez acheter Polarit ou l'un de ses analogues dans le magasin, vous pouvez utiliser un simple dentifrice, bien que son efficacité soit bien inférieure. Vous pouvez également masquer les dégâts à l’aide d’un vernis à ongles transparent ordinaire.
Pour éviter les rayures, il est préférable de placer des serviettes ou des petites nattes de bambou sur la table en verre.
Tables basses en verre, photo :


Table en verre bricolage. Vidéo
Table en verre sera un excellent ajout à n’importe quel intérieur. Cependant, son coût est assez élevé, surtout pour modèles de créateurs. Par conséquent, il est beaucoup moins coûteux de fabriquer soi-même une table en verre. Nous verrons comment procéder plus loin.
Table en verre à l'intérieur d'un appartement ou d'une maison privée
Verre - respectueux de l'environnement matériau pur, qui s'harmonise avec presque tous les objets et ajoute du chic à n'importe quelle pièce. Parmi les avantages du verre on note :
- combinaison avec tous les matériaux tels que le bois, le verre, le métal, le cuir, le plastique ;
- apparence élégante;
- sécurité incendie;
- variété de formes et de couleurs;
- durée de fonctionnement;
- capacité à transmettre la lumière;
- haut niveau de résistance lors de l'utilisation de verre spécial.

Une table en verre s'intègre très bien dans le salon ou la cuisine, ainsi que dans la chambre ou la chambre des enfants. Cette table rend la pièce plus sophistiquée, originale et esthétique.
DANS petite pièce, une table en verre contribuera à augmenter et à agrandir l'espace. De plus, le verre rend l’atmosphère plus légère et plus détendue.
Pour la fabrication de tables en verre, pour des raisons de sécurité, il est recommandé d'utiliser du verre trempé durable, résistant aux dommages mécaniques et aux rayures.
De plus, il est possible de réaliser des tables en verre avec du verre inhabituel, teinté, mat ou brillant. En ce qui concerne la forme, l'imagination est également illimitée ; les tables sont carrées, rondes et ordinaires. formes ovales ou asymétrique - ondulé. Ainsi, il est possible d'installer la table dans une pièce avec n'importe quel style d'intérieur.
Pour fabriquer des pieds de table, on utilise du métal, du bois, de la pierre ou de belles pièces forgées. Nous vous invitons à vous familiariser avec les caractéristiques de la combinaison d'une table en verre à l'intérieur :
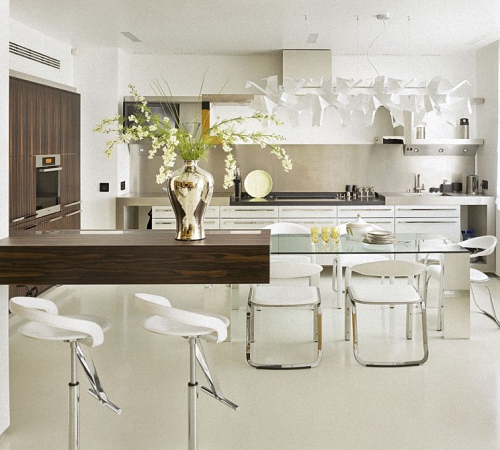
- Une excellente solution serait d'utiliser une table en verre dans une pièce qui combine une salle à manger avec une cuisine et un lieu de réception ;
- les tables en verre ou les petites tables sont les plus appropriées pour style moderne intérieur - moderne ou high-tech ;
- pour mettre l'accent dans la pièce sur une table en verre, il suffit d'utiliser du verre aux couleurs vives et saturées ou des mosaïques colorées ;
- Une table avec un plateau en verre foncé se distingue par son coût élevé et son luxe particulier ;
- Le revêtement du verre avec des composés spéciaux empêchera la formation de taches sur sa surface.

Table DIY avec verre : une variété de formes et de configurations
Fabriquer une table de transfert en verre sera excellente option pour une petite pièce. Les modèles de type coulissant ou pliable sont très populaires. Il est également possible de construire une table dont les pieds varient en hauteur. Si vous installez une table sur de petits pieds, elle fonctionnera comme table basse, sinon, cela s'avère être une table pour manger.
Les tables basses dotées d'un plateau en verre et de pieds en bois ou en acier sont très populaires et faciles à fabriquer. De tels modèles ont forme simple, donc pour les construire, vous n’avez pas besoin de compétences particulières en matière de découpe de verre.
Les chaises au rembourrage brillant seront un excellent ajout à la table à manger. Il est possible d'acheter des chaises à base de thermoplastique. De plus, l'utilisation de chaises en osier sera également très pertinente.
Si vous envisagez d'installer une table dans la cuisine, nous vous recommandons de choisir du carrelage, une hotte de réfrigérateur et d'autres équipements pour cette pièce. appareils électroménagers couleur chromée. Vous pouvez placer sur la table un panier contenant des fruits ou un vase de fleurs.
Une table de cuisine DIY avec du verre peut devenir superbe décoration pour toute cuisine ou salle à manger. Son installation dans une petite pièce est particulièrement pertinente. Verre clair peut agrandir et agrandir l’espace. Pour s'assurer qu'il ne reste aucune trace sur le verre après sa fabrication, il est recommandé d'appliquer une solution spéciale sur la surface du plateau, vendue dans une quincaillerie ou un magasin de meubles.

Meubles en verre fabriqués selon la méthode du cadre
Lorsque vous fabriquez votre propre table en verre et d'autres meubles à base de verre, cette méthode est le plus réussi. Pour ce faire, vous aurez besoin d'avoir planche de meuble, dans lequel un trou de n'importe quelle configuration est découpé.
Ensuite, le verre préalablement découpé y est fixé à l'aide d'une perle. Parmi les inconvénients cette méthode Ils notent l'aspect peu attrayant et l'impossibilité d'installer du verre suffisamment épais.
A l'aide de fixations mécaniques, après un certain temps, il est possible de changer de meuble et d'installer du verre différent. La présence d'une facette est obligatoire.
Les portes, fenêtres et certains modèles sont fabriqués de la même manière. bureaux en verre. La fixation du verre dans le cadre ne nécessite aucun traitement supplémentaire, l'ensemble du processus repose donc uniquement sur l'installation de la feuille de verre.

Caractéristiques de la photo de table en verre et de la découpe du verre
Avant de commencer ce processus Vous devez décider de l'épaisseur du verre et de la taille du coupe-verre. Il existe différents types de coupe-verre :
- type de rouleau ;
- type de diamant.
La première option est conçue pour un verre plus fin, jusqu'à quatre centimètres d'épaisseur. Ces outils comportent de un à six rouleaux. Chaque coupe-verre possède une ligne de coupe. Il existe des modèles dotés d'un réservoir d'huile ; pour les débutants, nous recommandons de les utiliser.
Le coût d’un coupe-verre diamanté est plus élevé que celui d’un coupe-verre à rouleau. Ces coupe-verres sont capables de couper du verre de plus d'un centimètre d'épaisseur. Pour couper du verre, vous aurez besoin d'une surface plane et dure sur laquelle est posé un film ou un tissu épais. Pour garantir une coupe uniforme, une règle en bois est nécessaire si vous devez couper du verre. une certaine forme, un modèle doit être réalisé à l'avance. À ces fins, nous vous recommandons d'utiliser du contreplaqué.
Vient ensuite le processus de préparation du verre pour la découpe. Pour ce faire, le verre est lavé et dégraissé. Si le verre a une surface ondulée, un coupe-verre diamanté ne conviendra pas pour le couper. De plus, ce verre est découpé exclusivement avec côté lisse. Avant de commencer le travail, nous vous recommandons de prendre un petit morceau de verre et d'essayer de le couper dans le bon sens pour vous habituer à l'outil et vous entraîner un peu. Lors de la découpe du verre à l'aide d'un coupe-verre à rouleau, la ligne le long de laquelle la découpe est effectuée est recouverte d'une solution de térébenthine.
La totalité de la feuille de verre doit s'adapter à la surface sans dépasser. Une règle ou un motif épais est placé directement sur la ligne de coupe. Le coupe-verre se tient à la main comme un crayon et est posé sur une règle. Pour éviter qu'il ne glisse sur la surface, nous vous recommandons de le coller avec du ruban adhésif à base de tissu. Le coupe-verre diamanté n'appuie pratiquement pas sur la surface, tandis qu'en le déplaçant le long de celle-ci, une bande se forme. Si la pression était trop faible et que le verre ne se sépare pas, la redécoupe n'est pas effectuée au même endroit. Cette règle pertinent pour les coupe-verres de type diamant et à rouleaux.
Le coupe-verre à rouleau est placé dans la main de telle sorte que l'anneau et majeur appuyé dessus. Après découpe, une bande blanche est obtenue. Ensuite, le verre est déplacé vers le bord de la table et tapoté par le bas à l'aide d'un coupe-verre. En tenant la partie principale du verre, cassez progressivement les zones qui ne se trouvent pas sur la table. À ces fins, vous pouvez utiliser des pinces ou le faire manuellement.
Si vous envisagez d'exécuter coupe de silhouette verre, puis pour cela, un motif est appliqué sur le verre, selon lequel la découpe sera effectuée. Ensuite, ce fragment est délimité par un rectangle découpé avec un coupe-verre. Petit à petit, les parties inutiles sont découpées avec un coupe-verre.
Pour garantir que les extrémités du verre ne soient ni coupantes ni inégales, du papier de verre est utilisé pour les polir.
Table basse en verre DIY
Nous proposons une option fait soi-même table basse avec pieds chromés. Les pieds sont fixés avec une colle spéciale, sans recourir à des mécanismes de serrage.
Pour acheter des accessoires supplémentaires, contactez une quincaillerie ou à des fins de mobilier. Pour construire une telle table, vous aurez besoin de pieds chromés dont la longueur dépend de vos préférences personnelles.
Vous devrez également acheter une colle spéciale, après application de laquelle aucune trace ne reste et le verre adhère très fermement à la surface. Cette composition est capable de polymériser uniquement en présence de rayonnement ultraviolet, produit par une lampe spéciale. Sous réserve de disponibilité de cet appareil, l'ensemble du processus de fabrication d'une table basse en verre ne prend pas plus de deux heures.
Veuillez noter qu'en utilisant de la superglue ordinaire ou mastic silicone- inacceptable. Premièrement, après leur utilisation, des troubles et des taches sont visibles sur la surface de la table. Deuxièmement, lors du fonctionnement d'une telle table, au bout d'un mois maximum, les pieds commenceront à s'éloigner de la surface.
Par conséquent, après avoir décidé de fabriquer une telle table, vous devez dépenser de l'argent en colle spéciale avec une lampe nécessaire à son durcissement. En même temps, cette colle, après durcissement, ne permettra pas de détacher le pied de table de la verrière ; si vous essayez de le faire, le verre se brisera tout simplement.

Lors de la construction d'une table basse en verre, utilisez du verre d'au moins 1 cm d'épaisseur. Pour la couper, vous n'aurez besoin que d'un coupe-verre diamanté.
Pour construire une table basse en verre, vous aurez besoin de :
- verre;
- coupe-verre;
- dirigeants;
- crayon;
- mitaines;
- colle à verre;
- lampe ultraviolette;
- perceuses;
- déposer;
- papier de verre.
Tout d’abord, déterminez tailles optimales et la forme de la table basse. En fonction de cela, il est recommandé de marquer directement sur le verre. La forme de la table peut être soit ovale, soit rectangulaire, soit arbitraire. Pour faire la deuxième option, vous aurez besoin d'une expérience de travail avec un coupe-verre.
Après avoir marqué la surface du couvercle, commencez le processus de découpe. Nous vous recommandons de vérifier les marquages plusieurs fois pour éviter les erreurs lors de la découpe.

Avant de commencer la découpe, le coupe-verre est plongé dans huile végétale, si nécessaire. Le processus de découpe est décrit en détail ci-dessus, nous ne nous y attarderons pas.
Après cela, le processus de meulage des extrémités de la surface du verre suit ; si cela n'est pas fait, il existe un risque de blessure lors de l'utilisation de la table basse. Pour commencer, enfilez des gants fabriqués à partir de tissu épais, prenez une lime et polissez la surface. Voici le processus d'utilisation d'une meuleuse diamantée, si disponible. Le travail est effectué à basse vitesse, le résultat est un bord légèrement arrondi et non tranchant. Vient ensuite le processus de ponçage de la housse de la table basse à l’aide de papier de verre. Le traitement des extrémités est complété par du feutre vendu sous forme de rouleau. Il est enroulé sur la surface, fournissant protection fiable verre En son absence, des compositions pâteuses spéciales sont utilisées, qui sont appliquées sur un revêtement pré-dégraissé. Leur coût est bien supérieur à celui du feutre.
L'étape principale de la construction d'une table basse consiste à fixer les pieds au couvercle. Pour ce faire, le plateau doit être retourné et posé sur une surface plane. Tout d'abord, des marquages sont effectués selon lesquels les pieds seront fixés sur la table. Ensuite, de la colle est appliquée sur le verre et le pied y est fixé. Les travaux doivent être effectués par au moins deux personnes. Pour polymériser la colle, utilisez une lampe spéciale à rayonnement ultraviolet.
S'il n'est pas possible d'acheter de la colle, nous vous recommandons d'utiliser des ventouses spéciales. Ils sont fixés au pied puis au verre. Pour une fixation supplémentaire des pieds sur les ventouses, une petite goutte de colle à bois est appliquée sur la surface du verre avant d'installer les pieds, elle assurera une fixation fiable ;

Installez une table et placez les livres là où les pieds sont fixés pour améliorer l'adhérence du verre et des pieds. Au bout de 48 heures, retirez les livres et lavez le verre solutions spéciales et installez-le dans le salon. Il est possible de recouvrir le verre d'un film décoratif spécial avec différents dessins imiter surface mate, ornements, fleurs ou mosaïques.
Le verre est l’un des rares matériaux qui convient également à n’importe quel intérieur. Le verre donne une certaine liberté à l'espace, l'apesanteur de la structure. Malgré son apparente fragilité, vues modernes Le verre peut atteindre la résistance du métal. Si tout récemment la présence de produits verriers à l'intérieur signifiait vases en verre, plats ou figurines, les temps ont changé : étagères, armoires, plans de travail tables basses et même les tables à manger en verre rivalisent avec succès avec le bois et le métal.
Ce qu'il faut savoir pour réaliser une table avec un plateau en verre
Malgré la résistance du verre moderne, son travail reste l'un des plus difficiles : les fragments et chutes de verre de toute épaisseur constituent un danger pour les autres, et les sections insuffisamment traitées produit fini peut devenir source de blessures très graves, voire de mutilations. Si vous décidez de fabriquer vous-même une table avec un plateau en verre, vous devez d'abord veiller à la sécurité de ceux qui l'utiliseront.
Le plus verre approprié pour dessus de table table à manger– triplex de 10 mm d'épaisseur ou trempé 6-12 mm : un plateau fabriqué dans ce matériau possède toutes les caractéristiques nécessaires - il est durable, peut résister aux chocs, résiste aux autres dommages mécaniques.
Le processus le plus difficile dans la fabrication de plateaux de table consiste à découper le verre selon les bonnes tailles et le traitement des coupes. En règle générale, lors d'un achat dans des magasins spécialisés, le service de découpe du verre aux dimensions requises est fourni - dans ce cas, le traitement des bords du plateau ne posera pas non plus de problème.
Le verre se combine mieux avec le bois et le métal (à moins, bien sûr, que vous envisagiez de fabriquer une table purement en verre). La combinaison du métal et du verre convient mieux au style high-tech, et le bois et le verre semblent organiques dans les intérieurs de tous styles.
Comment rendre une table en verre durable et fiable
Afin de vous asseoir sereinement à une table avec un plateau en verre fabriqué par vous-même, sans crainte pour votre foyer et pour la sécurité de la table, vous devez vous assurer de sa stabilité, relier solidement les pièces entre elles, fixer solidement le plateau au sous la table et traitez soigneusement ses bords, en arrondissant le tout coins pointus.
Méthodes de connexion du verre à divers matériaux peut être différent - chacun d'eux a ses propres inconvénients et avantages :

La conception de la table peut dépendre directement du choix de la méthode de fixation des pièces : il existe de nombreuses variantes sur la façon de fabriquer soi-même une table en verre et sur son apparence dans votre cuisine. Nous vous proposons plusieurs options que vous pouvez facilement utiliser pour réaliser une table avec un plateau en verre. Cependant, attardons-nous d'abord plus en détail sur le général caractéristiques technologiques fabriquer de telles tables, ce qui, en l'absence des compétences nécessaires, peut poser quelques difficultés.
Avant de commencer à fabriquer votre propre table en verre...
Difficulté 1. Sélection du verre
Lorsqu'il existe de nombreux types de verre différents, variant en couleur, type, spécifications techniques et le prix, vous pouvez être un peu confus au moment de choisir le bon.
Trouver combinaison optimale le prix et la qualité du matériau sélectionné seront aidés par un dessin préliminaire de la future table et ses considérations de sécurité exploitation ultérieure: plus il y a de verre dans la structure et plus la charge que cette partie de la table subira est importante, plus le verre doit être solide et épais.
La couleur et le décor du verre sont choisis en fonction style général la pièce où se trouvera la table.

De plus, il est nécessaire de prendre en compte le rapport entre le coût du verre, la complexité du contour de la pièce en verre, ainsi que vos compétences dans le travail du verre : lorsque vous découpez vous-même des pièces de design, il y a un risque d'endommagement. la toile si vous n'avez pas d'expérience dans la découpe du verre.
Difficulté 2 : Couper du verre
Bon de travail :
- Dessin terminé, indiquant les dimensions et la configuration de la partie en verre de la table en cours de fabrication - condition indispensable pour démarrer les travaux de découpe du verre.
- La deuxième condition est la présence l'outil nécessaire et des matériaux auxiliaires pour la découpe, ainsi que la réalisation de modèles selon lesquels elle sera réalisée.
Nous aurons certainement besoin de :

Vous pourriez également avoir besoin de :
- Un marteau avec un bouton en caoutchouc et une pince avec des patins en caoutchouc - utilisez un marteau pour taper sur la ligne de coupe pour une division uniforme, et avec une pince, cassez soigneusement les morceaux de verre le long de la ligne qui y sont encore laissés après la coupe ;
- Une fine tige d'un diamètre d'environ 3 mm, placée sous la ligne de coupe.
Si vous n'avez jamais tenu de coupe-verre dans vos mains, il est judicieux de vous familiariser d'abord avec un outil inhabituel en vous entraînant sur des chutes inutiles : apprendre à contrôler la force de pression (environ 2 kg, peut être mesurée sur une balance ordinaire), développer la stabilité de la main et apprendre à tracer une ligne continue sans dessins répétés - ce sont les principales conditions pour que le verre soit coupé correctement et efficacement.
La procédure à suivre pour effectuer les travaux de découpe du verre :
- À l'aide d'un chiffon imbibé d'une solution de bicarbonate de soude, nettoyez soigneusement le verre de la poussière et de la saleté et séchez-le - la surface destinée à la découpe doit être température ambiante, propre et sec.
- Nous posons le verre sur une surface plane et propre - il est important que les plans se touchent aussi étroitement que possible et que le bord le plus proche du verre coïncide avec le bord du substrat ;
- Nous décrivons les lignes de coupe - appliquons une règle ou un pochoir préfabriqué ; Si vous utilisez un coupe-verre sans alimentation en huile, vous devez tremper le rouleau du coupe-verre dans l'huile ;
- La ligne de découpe commence à l'extrémité de la feuille et s'effectue en un seul mouvement continu.
Important : le point où le coupe-verre commence à bouger se trouve à 2-3 mm du bord opposé - vous ne pouvez pas partir d'un bord tranchant. La ligne se termine dans l'autre sens - lorsque le coupe-verre saute de la surface à couper !
- À la fin de la ligne que nous venons de tracer (exactement à son point final !), placez n'importe quel objet rond et fin entre le verre et le substrat - vous pouvez utiliser un tournevis fin à tête plate. En appuyant fortement des deux côtés de la ligne, nous cassons le morceau de verre nouvellement coupé - si toutes les étapes ont été effectuées correctement, le verre se brisera exactement le long de la ligne tracée, quelle que soit la complexité de son contour (Fig. 4). Si cela ne se produit pas, il est nécessaire de casser les petits morceaux restant sur le fil de coupe en les tapotant légèrement avec revers marteau et à l'aide d'une pince ou d'une fente spéciale sur le corps du coupe-verre.
Le traitement des tranches se fait très lentement et avec soin, les mouvements de l'outil doivent être dirigés le long du plan à traiter. L'outil doit être humidifié avec de l'eau ou de l'essence de térébenthine pour éviter une surchauffe du bord du verre :
Après avoir réalisé le plateau, vous pouvez commencer à réaliser la base de notre table.
Option 1. Classiques immortels - style universel pour tout intérieur.
La particularité d'une telle table est le plateau, comme s'il flottait au-dessus de la base.
Les dimensions du plateau sont de 1350x800 mm, la hauteur des pieds est de 750 mm, la hauteur des supports du plateau est de 30 mm.
En conséquence, nous aurons besoin matériaux suivants:
- Plateau en verre 1350x800mm ;
- Barres pour pieds de table 50x50x75 mm – 4 pièces ;
- Planches en panneaux de particules stratifiés (épaisseur 25 mm) : 120x600 mm – pour les parties d'extrémité du piètement, 2 pcs. et 120x1150 mm – pour les parties latérales de la base, également 2 pièces ;
- Feuille d'aggloméré 1150x600 mm - pour un faux plateau (si vous ne voulez pas regarder à travers le plateau les genoux et les chaussures des personnes assises à table) ;
- Coins de meubles - environ 10 pièces, vis pour les fixer ;
- Confirmations étendues – 8 pièces ;
- Fixations pour le plateau (Fig. 6) – 4 pcs.
Le châssis est assemblé conformément au schéma (Fig. 7).
De plus, si vous décidez de réaliser un faux plan de travail, vous ne vous tromperez pas : sa surface peut être décorée en changeant jeu de couleurs table et même du style (par exemple, en posant un tapis avec des hiéroglyphes, ou des morceaux de corail et des galets de mer, ou encore simplement en plaçant de la toile de jute sous le verre).
Les supports pour le plateau sont fixés aux extrémités supérieures des pieds, les emplacements de fixation des supports sont soigneusement mesurés sur le verre du plateau, des trous sont percés et le plateau prend sa place.
Le plateau peut être fixé d'une autre manière, sans percer de trous - il est illustré dans le schéma de la figure 8 et est également utilisé dans la prochaine version de la table ronde.


