
Comment faire un toit semi-circulaire. Principes de calcul du toit voûté
Les formes les plus courantes de toits pour les chalets sont en croupe et à pignon. Cela est dû au fait que cette forme de toit est bien connue de nombreux constructeurs, et toutes les étapes de fabrication sont décrites en détail dans toute publication méthodologique.
Cependant, de nombreux promoteurs privés souhaiteraient s'éloigner des "timbres". Il y a un intérêt croissant pour les toits en dôme, semi-circulaires et en lancette. En plus d'une apparence attrayante, un tel toit présente un certain nombre d'avantages importants:
- Haute résistance et capacité portante;
- Haute résistance à vent fort;
- La neige ne s'accumule pas à la surface d'un tel toit et l'eau de pluie ne stagne pas ;
- Volume interne plus grand espace utilisable et la hauteur du plafond dans un grenier résidentiel ;
- Les éléments du système de fermes cintrées (surtout s'ils sont réalisés sous forme de fermes) peuvent devenir un élément décoratif spectaculaire. décoration d'intérieur grenier.
Réfléchissant à la fabrication d'un toit semi-circulaire en bois et comprenant les nombreux avantages d'un toit «incurvé», de nombreux développeurs sont effrayés par le prix élevé d'un système de fermes en arc, la complexité de son calcul et de sa fabrication: en environnement industriel lamelles (à partir desquelles sont fabriquées les poutres collées), cuites à la vapeur jusqu'à 100°C, à humidité élevée(qui donne l'élasticité de l'arbre) sont pliés selon un modèle spécial, puis collés ensemble et séchés dans des chambres de séchage.

Le long de la ligne de pliage du bois, des coupes spéciales peuvent être effectuées - "sur un cône" ou "sur un rectangle". Cela simplifie le processus de cintrage du bois.
Dans le cadre de la construction privée, de telles étape technologique difficile et économiquement impossible à répéter. Et lors de l'utilisation de pièces industrielles - sous forme de poutres collées pliées, de fermes courbes en acier et en bois, etc. - le coût d'un tel système de fermes augmente plusieurs fois. Par conséquent, les utilisateurs de FORUMHOUSE proposent leurs propres moyens, plus "budgétaires", selon lesquels les chevrons arqués et les chevrons de toit semi-circulaires sont fabriqués.

Nikofar Utilisateur de FORUMHOUSE, Moscou
J'avais prévu de construire une dépendance à ossature avec un toit en lancette semi-circulaire. Pour ce faire, je devais devenir en une seule personne : un architecte, un concepteur, un maître d'ouvrage, un estimateur, un « commanditaire » de la construction, un contremaître, un spécialiste du suivi technique et un constructeur. Mais le résultat en valait la peine. J'ai réussi à concrétiser toutes mes idées. Et pour plusieurs centaines de milliers de roubles (dont 260 000 sont allés uniquement au «charpente») pour construire une maison avec un «toit en lancette», 3 chambres, une cuisine-salon, un hall d'entrée, une salle de bain séparée et un petit hall au deuxième étage.

Ce que le membre du forum a fini avec peut être vu sur cette photo.

Les étapes de fabrication d'un système de ferme "plié" sont particulièrement intéressantes.

Au sens classique, ce "chevron" n'a pas les pieds de chevron habituels.

De plus, il n'y a pas d'éléments collés. Si vous regardez les photographies, vous pouvez dire que des éléments empruntés à la construction navale ont été utilisés dans le système de fermes.

L'essence de la technologie utilisée Nikofar se compose des éléments suivants :
- La charge principale est portée par la "ferme avant". Dans cette ferme, le bord du rayon extérieur est constitué de "cadres". Les "cadres" sont constitués de lamelles courtes, assemblées en deux couches et fixées ensemble avec des vis.

- Des "longerons" horizontaux sont posés entre les fermes de pignon, s'étendant du bord supérieur paroi verticale jusqu'au faîtage du toit.

- Des entretoises constituées de lamelles sont installées entre les longerons. Ces lamelles ont un rayon extérieur de courbure coïncidant avec le rayon du toit.


Les lattes ont été coupées à la tronçonneuse. Pour simplifier et accélérer le marquage des lamelles, un gabarit spécial a été créé - un demi-cercle de deux lattes et du contreplaqué de 12 mm d'épaisseur.

Un tel gabarit est découpé pour un rayon spécifique et pré-calculé de la courbure du toit. De plus, avant de procéder à la fabrication d'un système de ferme incurvé, vous devez créer un gabarit de rayon pleine grandeur. Vérifiez sur le site d'installation si le rayon requis est respecté, si tout est calculé correctement, et seulement après cela, procédez à la fabrication des pieds de chevron restants. Cela évitera le mariage et apportera en temps opportun les ajustements appropriés aux dimensions du système de fermes et du gabarit.


Si vous remplissez votre main, alors pour la fabrication d'une lamelle "rayon", y compris le marquage et la sélection tableau souhaité, les travailleurs ont pris environ 3 minutes.

Après l'achèvement de la construction du système de fermes, une caisse a été placée le long de la charpente du toit. Sur la caisse (afin d'économiser de l'argent), au lieu de contreplaqué ou d'OSB, un second choix planche bordée- 10x2,5 cm Le pas entre les planches est de 5 cm, puis la toiture en onduline a été montée.

La méthode proposée de fabrication d'un chevron "plié" et le processus d'érection d'un chevron peu coûteux maison à ossature sous résidence permanente a trouvé une large réponse sur le forum. Les membres du forum ont également exprimé leurs avantages et inconvénients quant à la faisabilité économique de la construction d'un tel toit en lancette. Nous avons aussi parlé du gaspillage de bois. Voyons à quel point c'est vrai :

Grâce à la section arquée toit à pignon, à coûts comparables pour le bois, utile interne le volume d'un tel grenier résidentiel sous la voûte est plus grand que le grenier d'une conception traditionnelle, ainsi qu'un grenier avec des porte-à-faux accrus.

Tous les dessins ci-dessus ont été dessinés par Nikofar non pas dans un programme graphique spécialisé, mais en utilisant la "vieille" peinture MS.
Le toit voûté, de par sa forme, peut supporter des charges très lourdes, ce qui était bien connu des bâtisseurs de l'antiquité.

Le projet d'une maison avec un toit semi-circulaire d'un membre de notre forum est également très intéressant. tortilla folle.

tortilla folle Utilisateur de FORUMHOUSE
Je veux construire une maison avec un toit semi-circulaire. Selon le projet, une portée non étayée de 11x8 mètres est à couvrir. Je pense utiliser des poutres en I en bois pour cela. Ensuite, fabriquez un revêtement de sol OSB par le haut et posez un toit souple. Il n'y aura pas de grenier. Aide-moi à comprendre, comment faire un toit en bois semi-circulaire.

Du contreplaqué résistant à l'humidité ou des panneaux OSB jusqu'à 9 mm d'épaisseur peuvent être utilisés pour préparer la base pour la pose de tuiles flexibles le long d'un toit arrondi. Les plaques de cette épaisseur se plient "en place" sans l'utilisation de dispositifs spéciaux. Pour ensemble épaisseur requise terrains, matériel de planche de faible épaisseur (6 mm) peut être posé en deux couches, les coutures de la couche inférieure se chevauchant avec la couche supérieure.
Après un brainstorming sur le forum et des disputes sur le type de construction du système de fermes pour un tel toit, une décision a été prise: au lieu de poutres en I horizontales, utilisez une ferme collée pliée en bois. Après cela, le membre du forum a commandé un projet de ferme au concepteur. La photo ci-dessous montre les dessins finis de ces fermes.

Récupérer les fermes pliées (pour l'économie) tortilla folle décidé par moi-même. Structurellement, la ferme est assemblée à partir de trois couches de bois, pour lesquelles des planches de 150x30 mm sont utilisées.
Souhaitez-vous que votre maison ressemble à un château ou à un palais médiéval ? Concevoir un toit conique. Cette option rend le bâtiment fabuleux et solennel. Découvrez les secrets de l'installation d'un système de fermes de toit coniques et obtenez de précieux conseils de spécialistes pour sa réparation.
Avantages de la construction d'un toit conique
Un toit conique est installé dans les bâtiments ronds. Parmi les avantages on note :
- atypique et attractif apparence;
- facilité d'entretien de la structure;
- longue durée de vie.

Inconvénients d'un toit avec une caisse circulaire :
- calculs complexes pour sa construction;
- l'apparition de problèmes avec la réparation;
- prix élevé;
- difficulté d'installation;
- un grand nombre de matériaux de couverture.
Un toit conique est construit sur un bâtiment de forme ronde ou à multiples facettes. Le système de chevrons est installé de manière à assurer une pente uniforme des chevrons. Des éléments supplémentaires sous forme de pistes remplissent la fonction d'éléments de support. La partie annulaire supérieure de la course est fixée sur les piliers centraux et reprend la charge de la tour. Le deuxième point de référence est un Mauerlat annulaire monté sur le mur de la tour. Poutres de plafond conçu de manière à répartir uniformément la charge sur le site d'installation de l'élément de support central.

La fixation de la course annulaire est réalisée par des croisillons. Un toit circulaire de haute qualité est un calcul minutieux de chaque nœud du système. En l'absence d'expérience dans la réalisation de ce type de travail, nous vous recommandons de contacter des spécialistes dans la préparation de la documentation du projet.
Si le système de chevrons est en bois, utilisez des poutres collées à cet effet. Surtout si la toiture est réalisée avec des tuiles naturelles. La caisse en dessous doit être à haute résistance et puissante.
La finition du toit conique se fait avec des bardeaux, des bardeaux de bois ou de métal. L'utilisation de matériaux ondulés sur un toit rond n'est pas pratique. L'amarrage du matériel prendra beaucoup de temps et nécessitera une augmentation des coûts. De plus, l'esthétique de la toiture est réduite et l'eau s'écoule entre les joints.
Variétés et conception d'un toit conique
Nous vous proposons de vous familiariser avec deux options pour un toit rond:
- bombé;
- église bulbeuse.
Le toit en forme de dôme, contrairement à celui en forme de cône, n'a pas d'éléments en treillis en couches. Le système de chevrons du toit en dôme est suspendu. Les pièces suspendues forment un arc à trois articulations, qui est relié au Mauerlat d'un côté et de l'autre à l'anneau de support installé sur le dessus.
Pour concevoir un toit en dôme, vous devez avoir une expérience et une connaissance technique considérables de la théorie de la mécanique et du Sopromat. Sinon, nous vous recommandons de contacter les entreprises de construction traitant de problèmes similaires, elles vous aideront à établir correctement les dessins du lattage de toit circulaire.
Pour calculer un toit en dôme en bois, suivez ces étapes :
- charges affectant le système de fermes ;
- des arcs de fixation sur le support central et une lanterne de ventilation ;
- le sommet du dôme;
- charnière de serrure, dans la partie supérieure du dôme;
- la forme des trous de ventilation.

Une conception semi-circulaire peut être obtenue en fabriquant une caisse annulaire. Il est installé sur des racks supplémentaires basés sur des arcs en treillis suspendus.
Une autre méthode de montage d'un toit en dôme a été proposée par R. B. Fuller, un architecte américain. La conception est formée à l'aide de triangles. Ce dôme est dit "géodésique". La complexité des calculs dans l'organisation d'un tel toit et son apparence inhabituelle ne l'ont pas rendu populaire en architecture.
Il existe deux façons de fixer le dôme selon le système "géodésique":
- connecteur - pour connecter des triangles, des morceaux de bois et des attaches spéciales sont utilisés;
- sans connecteur - tous les triangles sont assemblés à l'avance, la structure générale est déjà assemblée sur le toit.
Parmi les avantages d'un tel toit, on note :
- la possibilité de son vitrage intégral ;
- facilité de déneigement;
- excellente résistance aux menaces du vent;
- apparence inhabituelle;
- la possibilité d'aménager sa propre serre sur le toit de la maison.

Le volume interne maximal du toit géodésique vous permet de créer les mêmes structures rectangulaires, augmente la quantité de lumière et d'air dans la pièce. En été, la chaleur est absorbée par le toit, et en hiver, au contraire, elle est dissipée. Ainsi, les coûts de chauffage et de refroidissement sont réduits. Le dôme géodésique n'a pas besoin d'une fondation coûteuse en raison de sa légèreté. La structure du dôme est très résistante au vent et aux intempéries. De plus, nous notons les excellentes caractéristiques d'insonorisation du bâtiment, en raison de la forme extraordinaire.
Le toit bulbeux est le plus souvent installé sur les temples et églises orthodoxes. En logement privé cette option la toiture est moins populaire. D'un diamètre de dôme inférieur à 300 cm, sa partie charpente est en bois.
La forme spécifique de ce toit s'appelle une "grue". Cette version du système de fermes est appelée en couches. Pour donner une rigidité supplémentaire au toit, des éléments sous forme de contreventements et d'entretoises sont installés. Ils assument le plus de fardeau. Pour découper la «grue», des motifs et des planches spéciaux sont fabriqués, épaisseur minimale qui est de 40 millimètres. Le pilier central sert de support aux "grues" et place la croix sur le dôme.
Si du métal est utilisé pour la finition du dôme, une caisse est montée sur les grues par incréments de 30 cm.Il est possible de finir le dôme avec un toit écailleux. Dans ce cas, un élément supplémentaire de sa fixation est installé sous chaque échelle.
Réalisant la restauration du dôme de l'église, celui-ci est recouvert d'un soc de tremble. Ils sont montés de manière à empêcher l'humidité de pénétrer entre les rangées. Les dômes de ce type se caractérisent par la complexité de la conception et de l'installation. Un travail de qualité ne peut être réalisé que par des professionnels. Si le diamètre du dôme est supérieur à 300 cm, l'acier est utilisé pour son cadre. Dans ce cas, des entretoises métalliques sont utilisées pour fixer les grues. La caisse est constituée de bandes d'acier installées par incréments de 40 à 50 cm.Le métal de couture est utilisé pour finir le toit.
Technologie de construction d'un toit conique
Nous offrons la possibilité de créer de petites tourelles en forme de cône adjacentes à la maison. Un tel toit n'est pas le principal, cependant, des connaissances particulières sont nécessaires pour sa construction. Le système de chevrons dans les petites tourelles est installé en forme d'éventail. Le poteau central commun est l'endroit où les jambes du chevron divergent. Les enclos remplissent une fonction de support supplémentaire, du bois collé est utilisé pour leur fabrication. Il existe deux options pour les courses - supérieure et inférieure. Chacun d'eux remplit la fonction de répartition uniforme de la charge. Après avoir développé un projet de toit conique, des roues sont fabriquées. Les extrémités des chevrons sont fixées sur un demi-cercle, augmentant ainsi la résistance de tous les joints.
Pour plus de stabilité du toit, le plan inférieur des chevrons est scié à un certain angle. Pour fixer pièces en bois utiliser des coins en acier.
Lors du calcul du nombre de pieds de chevrons pour un toit en forme de cône, tenez compte des moments tels que la section transversale du matériau à partir duquel ils sont fabriqués et l'intervalle pour leur installation. Sur la face inférieure du toit, l'espacement entre les chevrons doit être réduit au minimum. Ainsi, la caisse pour une toiture supplémentaire sera réalisée avec le virage le plus lisse possible. Pour ce faire, une entretoise supplémentaire de section plus petite est posée dans la partie inférieure entre la poutre principale, elle rendra la surface plus durable et soignée.

Ensuite, installez la gouttière. Leurs versions semi-circulaires sont fabriquées exclusivement sur commande. Pour l'auto-assemblage du système, il suffit d'utiliser de petits segments de gouttières droites ordinaires, en les reliant à l'angle souhaité. Toutes les connexions doivent être serrées et nettes.
Prenez soin de la caisse, qui est le plus souvent utilisée pour créer des poutres en bois, des pièces en plastique souples ou ordinaires Tuyaux d'eau. Capacité de chargement derniers éléments convient uniquement pour l'entretien d'un petit toit utilisé comme décoration, mais pas pour le toit principal en dôme. Pour plus de solidité, pliez les tuyaux ou les poutres en 2. Pour les fixer sur le système de chevrons, utilisez des vis autotaraudeuses.
La finition du toit en forme de cône est réalisée de manière pliée. La tuile est posée à la surface de bardeaux ou de roseaux. Lors de la finition du toit avec des tuiles, gardez à l'esprit que la largeur des tuiles augmente de haut en bas. Par conséquent, choisissez des versions spéciales de carreaux coniques pour éviter les joints bout à bout bâclés. Calculez la longueur des éléments de la ferme, la surface totale du toit, sur cette base, achetez la quantité requise de matériaux de finition.
Installez la garniture de bas en haut. Chaque dalle est installée avec un léger chevauchement par rapport au côté et sous-jacent. A la jonction du toit mur extérieur, installez l'étanchéité.

Découvrez les caractéristiques pour la construction d'un toit conique:
1. Les pentes sont ramenées à la surface du toit d'au moins trente centimètres.
2. Sur une normale sol en béton une poutre standard est installée et le système de chevrons est déjà fixé dessus.
3. Pour plus connexion étroite les sections d'extrémité des chevrons, nous recommandons de les affûter.
4. Les parties supérieures des chevrons sont montées sur un support semi-circulaire et reliées les unes aux autres à l'aide de coins en acier.

5. La caisse est constituée de barres semi-circulaires : éléments longs et courts.
7. Avant de carreler, sécuriser les drains.
8. L'intervalle d'installation de la caisse est déterminé par le type matériau de finition toits.
9. À l'aide de tuiles coniques, pré-marquez les éléments de chaque rangée. Réduisez la quantité de matériau pour chaque rangée individuelle.

souple ou zona installé sur une base solide. À ces fins, le contreplaqué en feuilles minces est le plus souvent utilisé. Pour créer un toit thermique, une isolation, un pare-vapeur et une étanchéité sont également posés.
Le contreplaqué est découpé en forme de trapèze, posé de bas en haut. L'épaisseur des couches de revêtement en contreplaqué doit être d'au moins 12 cm, c'est-à-dire qu'en utilisant du contreplaqué de 4 mm, posez-le sur la base en 4 couches. Ensuite, une protection contre l'humidité et des tuiles bitumineuses sont montées.
Un faîtage en acier est installé sur la partie supérieure du toit en forme de cône. Pour sa fabrication utilisant de l'acier, du cuivre, de l'aluminium, de l'inox. De plus, si nécessaire, montez une girouette.
Lors du choix d'un outil pour la construction d'un toit conique, il est nécessaire de s'appuyer sur les matériaux pour la fabrication du lattis et de la toiture. Dans le même temps, si la caisse est montée en bois, vous aurez sans aucun doute besoin d'une scie sauteuse, d'un perforateur, d'un tournevis. Utilisant matériaux en acier, faites le plein d'une meuleuse avec des disques à tronçonner, des perceuses à métaux et une perceuse électrique.
Vidéo sur l'installation d'un toit conique:
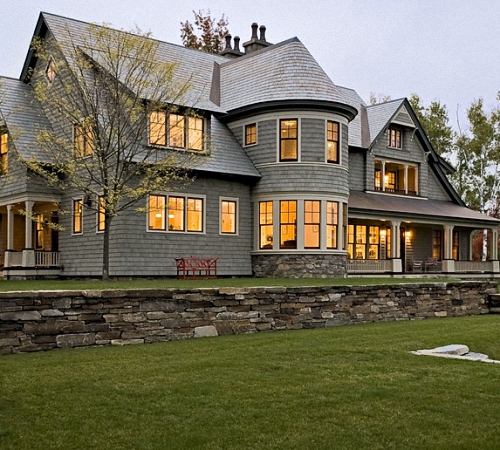
La sagesse orientale dit que les fenêtres de la maison sont ses yeux, la porte d'entrée joue le rôle de la bouche et la coiffure de la maison est son toit. Et tout comme la coiffure d'une personne détermine souvent son apparence, le toit de la maison y occupe la même position dominante. Le toit voûté semble avoir été créé spécifiquement pour les propriétaires d'un goût architectural et artistique raffiné, car il attire littéralement l'attention et crée une atmosphère inhabituelle et sublime dans espaces intérieursà la maison.
Les toits en arc ou en dôme sont le plus souvent réalisés sur des auvents, des visières, belvédères d'été. Cependant, vous pouvez souvent trouver un abri de jardin avec un tel système de toiture, et même résidentiel une maison privée. Dans les habitations à l'aménagement complexe, un toit voûté peut jouer le rôle d'un centre de composants, donner à une telle maison complétude et unité.
Avantages des toits voûtés
De tels toits, en plus des différences externes de toits en pente, ont devant eux aussi un certain nombre d'avantages :
- la forme de l'arche est avantageuse du point de vue de l'aérodynamisme, car les flux d'air ne sont pas gênés par le toit et ne créent pas de pression ou charge de vent sur sa conception ;
- la forme profilée contribue au glissement sans entrave de la neige du toit ;
- le toit transparent offre une bonne lumière du jour Total espace intérieur dessous;
- un bâtiment avec un tel toit ressemble à un ancien de l'extérieur et de l'intérieur;
- plus d'air est placé à l'intérieur de la structure qu'avec toit en pente qui affecte favorablement le bien-être de ses habitants.

cadres porteurs
Ils peuvent être effectués :- À partir de tubes en acier profilés (carrés).
- À partir de profilés en aluminium standard : en forme de H, de U, de F, etc. L'aluminium ne se corrode pas, ne nécessite pas d'entretien et est très facile à installer. Le profil en aluminium a un aspect esthétique et, surtout, pour structure arquée toit, il pèse relativement peu. Le seul inconvénient est le coût élevé.
- A partir de structures en béton armé. Dans la construction de particuliers, une telle charpente est très rare, en raison du coût élevé, des difficultés de transport et du poids important. Pour que les murs tiennent charpente en béton toits, ils doivent être d'une résistance accrue et reposer sur une base solide. Vous ne pouvez pas vous passer d'un équipement spécial de levage pour l'installation de fermes en béton armé. Tout cela augmentera les coûts de construction.
- Il existe également une version sans cadre du toit voûté, lorsque des tôles d'acier galvanisées suffisamment rigides (ou des panneaux voûtés du soi-disant carton ondulé voûté) constituent à la fois le cadre et la couverture du toit.

Couverture de toits voûtés
Comme couverture de tels toits sont utilisés:
Cink Acier
Ses tôles, ayant la rigidité nécessaire, peuvent servir non seulement de couverture de toit, mais également de cadre de support. Grâce à la galvanisation, ils font d'une pierre deux coups : ils obtiennent une charpente solide et rigide ainsi qu'une toiture étanche. toit voûté.

Carton ondulé arqué
Contrairement au mur, il est produit déjà plié le long d'un arc d'un certain rayon et est monté non pas en feuilles séparées, mais en travées entières sur un cadre en aluminium ou en bois.
Autres options de couverture
- Bois lamellé-collé
- Contre-plaqué
- Cloison sèche
- Panneaux OSB
- Matériaux transparents : polycarbonate alvéolaire ou en feuille, verre tendu, Plastique.
Toit en polycarbonate
Feuille et polycarbonate cellulaire tout aussi demandé et souvent utilisé aujourd'hui dans la construction de toits arrondis de bâtiments modernes. Le polycarbonate a une capacité unique à se plier facilement à froid, ce qui permet de l'utiliser dans des structures de toit de formes très variées.
Cependant, le matériau transparent présente également des inconvénients :
- son apparence perd facilement son attrait en raison des rayures et des éclats ;
- si le polycarbonate n'a pas de protection anti-grêle sous la forme d'un film spécial, les gros grêlons peuvent l'endommager;
- le matériau a un coefficient de dilatation thermique élevé, ce qui nécessite une prise en compte obligatoire lors de l'installation;
- s'il y a une grande pièce sous le toit voûté transparent, en été, il peut faire une chaleur insupportable à cause de l'effet de serre. Par conséquent, dans de telles pièces, il est nécessaire d'installer un système de climatisation et / ou une ventilation forcée.

Maison voûtée (vidéo)
Aménagement d'un toit voûté avec un revêtement en polycarbonate
Avec l'extrême simplicité de conception de ce type de toit, il est assez difficile de réaliser les arcs du cadre porteur à partir d'un tube carré ou d'un profilé en aluminium. La principale difficulté réside dans la nécessité d'une flexion uniforme de l'arc sur toute sa longueur. La meilleure façon de le faire est d'utiliser un modèle.
Pour plier l'arc, des coupes doivent être faites dessus avec le même pas. Plus vous faites de telles coupes, plus le rayon de l'arc filaire que vous pouvez obtenir est petit. Cependant, il ne faut pas oublier que le polycarbonate se caractérise par le rayon de courbure minimum possible, qui ne peut plus être réduit, car la feuille peut se casser.

Après avoir plié à partir du profil d'un arc, il est essayé sur le site d'installation. Si nécessaire, nivelez et fixez sa forme avec des raidisseurs. Ce premier arc servira de modèle lors du pliage d'autres éléments de cadre.
Les feuilles de polycarbonate sont fixées avec des arcs de cadre, sur lesquels, avec une grande surface de toit, une caisse en aluminium est installée à l'aide de vis autotaraudeuses avec des rondelles thermiques d'étanchéité.
Les trous pour les vis autotaraudeuses sont percés à l'avance, leur diamètre doit être supérieur de 3 à 4 mm au diamètre des vis autotaraudeuses pour éviter les déformations dues à la dilatation thermique. Les vis doivent être vissées le long des rayons de la surface arquée.
L'agencement fait à la main du toit d'une maison sous la forme d'une arche n'est pas un processus facile, il nécessite que l'interprète ait certaines compétences et une certaine attention dans la fabrication de la structure du toit. C'est pourquoi un tel toit n'est pas si courant. D'autre part, un auvent ou un auvent cintré en polycarbonate, basé sur un cadre en tuyaux carrés, tout à fait capable de faire n'importe qui.
Les toits voûtés, en forme de dôme ou semi-circulaires sont généralement courants dans bâtiments publiques avec une grande capacité; salles d'exposition, piscines, complexes sportifs, galeries, jardins d'hiver. Cependant, les promoteurs privés de ces dernières années ont également commencé à prêter attention à cette ancienne sophistication architecturale. Beaucoup, y compris des citoyens loin d'être riches, veulent avoir une maison avec un toit voûté.
La construction d'un toit semi-circulaire est plus laborieuse qu'un toit en pente classique, mais le résultat est toujours impressionnant.
Il convient de noter que le toit semi-circulaire a attiré les gens non seulement en raison de sa forme inhabituelle. Il y a aussi des avantages pratiques de cette méthode, qui a ses propres variétés.
Avantages et caractéristiques de conception d'un toit en dôme

Un exemple de dessin d'une pente de toit en pente : les dimensions extérieures et intérieures doivent être indiquées.
Aujourd'hui, vous pouvez voir de nombreux bâtiments avec une construction complexe et une disposition architecturale. Un toit en dôme n'est qu'une option pour aménager de telles structures. Un tel toit, que même un immeuble résidentiel ordinaire peut avoir, peut aider à résoudre un certain nombre de problèmes. Par exemple, se déplacer d'une pièce à l'autre, fournir un toit au-dessus d'une terrasse ou d'une véranda. Outre, :
- a une haute résistance à la charge du vent;
- ne "permet" pas l'accumulation de neige à sa surface;
- crée un volume d'air important à l'intérieur de la pièce, ce qui a un effet bénéfique sur la condition physique des personnes;
- fournit de la lumière naturelle (si le toit est transparent), ce qui permet d'économiser de l'argent sur les factures d'électricité.
Dans de tels toits, les éléments de support sont des arcs, des fermes, courbés en conséquence. Le matériau de fabrication peut être du métal, du béton armé ou du bois. Le plus couramment utilisé dans la construction résidentielle dernière option. Le bois est relativement durable et en même temps matériau léger. Cela vous permet de réduire la charge sur la maison, les fondations et donc de dépenser moins d'argent pour la construction. Le seul inconvénient du bois est sa fragilité relative, peu caractéristique du métal. Et si le profil en fer pour l'agencement du cadre est lourd, l'aluminium conviendra parfaitement. Ce matériau ne cède pas à la corrosion, ne demande pas de service, son installation est simple ; profilé en aluminium esthétiquement attrayant et, surtout pour un toit en dôme, il est léger. Le seul point négatif est le coût élevé.

Le système de fermes, comme toute la structure, a un aspect arrondi.
Les tuiles naturelles sont l'une des options coûteuses et chronophages pour aménager un toit en dôme. Comme c'est encore un plaisir coûteux, plus souvent Maison de vacances avec un toit semi-circulaire préfèrent couvrir toit souple(tuiles souples par exemple). Et si le bâtiment n'est pas résidentiel, les propriétaires modernes utilisent le polycarbonate comme toit pour les toits en dôme. Ce pas cher matériel moderne, qui a une petite masse et un degré élevé transparence. Le polycarbonate est résistant aux contraintes mécaniques, a une résistance élevée aux rayons ultraviolets, il est facile à installer - tout cela a conduit à la grande popularité du polycarbonate parmi les fans de structures en dôme. Habituellement, les gazebos, les rotondes sur le site, parfois les serres, les serres sont recouvertes de ce matériau.
Dispositif de toit en dôme
La maison, équipée d'un toit semi-circulaire, dispose d'un système de fermes suspendues. Il s'agit d'un arc ordinaire sur 3 charnières. À une extrémité, il repose sur un anneau monté dans un poteau installé au centre même du bâtiment, et de l'autre, sur un Mauerlat situé sur le mur. Mauerlat est une bûche, une poutre située le long du périmètre du mur et servant de support aux chevrons. L'agencement d'un tel système nécessite une bonne connaissance du "Sopromat" classique, les bases de la "Mécanique Théorique". Par conséquent, il n'est pas recommandé à une personne non préparée de s'engager de manière indépendante dans la construction d'un toit en dôme pour un immeuble résidentiel.

Toit semi-circulaire à ossature de revêtement panneaux de particules vous permet de préparer la base pour la pose de matériaux de toiture.
Le toit semi-circulaire devient grâce à la caisse annulaire, qui est installée sur des supports spéciaux, reposant à une extrémité contre les arcs des chevrons. Mais il existe une autre version du toit en dôme, que n'importe quelle maison ou bâtiment peut avoir. L'architecte américain R.B. Fuller offert une option toit semi-circulaire sous la forme d'un ensemble de triangles combinés. Cette conception est parfois appelée "dôme géodésique". Il a été officiellement introduit pour la première fois en 1951, mais il n'a pas été particulièrement largement utilisé. La raison principale est la conception inhabituelle et la complexité des calculs d'ingénierie.
Le "dôme géodésique" présente des avantages évidents : sa surface peut être entièrement vitrée (avec les mêmes fenêtres à double vitrage). Cela signifie qu'il n'y aura aucun problème de déneigement. La conception a une très bonne résistance aux charges de vent. Souvent, les propriétaires de banlieue décorent, par exemple, des serres avec un design similaire. "Dôme géodésique" peut être :
- Connecteur : le cadre est constitué de morceaux de poutres en bois, de serrures de connecteur. L'ensemble du système est monté directement au-dessus des murs du bâtiment.
- Sans connecteur : les panneaux de forme triangulaire sont pré-assemblés par le fabricant puis installés sur site.
Dôme "oignon"

Le matériau de couverture idéal pour un toit semi-circulaire est le bardeau.
Celui-ci se tient un peu à part, car. une maison avec ce type de toit est peu susceptible d'être trouvée aujourd'hui, mais pour Églises orthodoxes une telle conception a longtemps été une sorte de carte de visite dans le monde de l'architecture. Cependant, il y a quelques siècles, les manoirs royaux et les tours de boyard résidentielles avaient un tel toit. La raison pour laquelle ceux au pouvoir ont construit une maison avec un toit d'une telle conception est banale - tout de même pratique et seulement en partie - un soupçon de proximité avec le temple et le dieu.
Pour les petits dômes, d'un diamètre ne dépassant pas 3 mètres, le bois est utilisé comme matériau pour les chevrons. Les jambes de chevron du dôme en oignon ont leurs propres spécificités - une forme spéciale appelée "grue". Il s'agit d'un système de treillis incliné, dans lequel les "grues", basées sur le pilier central, reçoivent une rigidité supplémentaire par différents types d'entretoises, entretoises, installées là où la plus grande charge est attendue. Pour couper les "grues", utilisez des motifs spéciaux en bois. Pour les grands dômes, d'un diamètre supérieur à 3 mètres, il vous faut carcasse en métal. Des bandes de métal sont utilisées comme caisse.
À ce jour, le toit en dôme est encore inconnu des yeux. Cependant, la praticité de ce type de design, son caractère inhabituel et son attrait trouveront sûrement beaucoup plus de fans parmi les propriétaires.
En substance, il ne peut y avoir de toit complètement rond. La structure du toit peut être conique ou bombée. Un tel toit ne peut être appelé rond que conditionnellement, car il encadre un bâtiment rond, par exemple. En tant que matériau de couverture pour de tels toits, on utilise généralement des tuiles naturelles ou du métal, mais récemment le soi-disant carreaux souplesà base de bitume.
Il convient également de noter en particulier que pour construire un système de fermes pour un tel toit, vous devez effectuer de nombreux calculs et dessins. Cela signifie que vous devez avoir une connaissance approfondie dans le domaine mathématiques supérieures et dessin. S'il n'y a pas de telles connaissances, le moyen le plus optimal de sortir de la situation serait de faire appel aux services de spécialistes.
Si nous décrivons le système de fermes qui équipe une maison à toit rond, il faut dire qu'il est monté sur un principe en couches. Les nervures ou chevrons de raidissement reposent avec une extrémité sur le mauerlat annulaire, qui est posé le long du périmètre des murs du bâtiment, et avec l'autre extrémité sur la course annulaire, qui est fixée au pilier porteur central. Plusieurs de ces pistes peuvent être équipées, en fonction de la hauteur du toit.
Noter! L'installation d'un poteau central entraînera une charge accrue sur plafonds, qui doit être pris en compte lors de la conception et du choix d'un matériau de toiture.
Si l'on suppose que le futur toit aura une forme en dôme, les chevrons doivent être sous la forme d'arcs, qui sont également attachés avec un bord à la base sur le mur, et le second au support d'anneau monté en haut du pilier central.

TOIT CONIQUE
Afin de mieux comprendre l'essence du processus de fabrication d'un toit en forme de cône, il est nécessaire d'examiner plus en détail la technologie de sa production.
· Tout d'abord, l'imperméabilisation est posée sous le Mauerlat. Pour ce faire, vous pouvez utiliser le matériau de toiture familier et bien connu.
Après son installation, le Mauerlat lui-même est monté, qui peut être utilisé comme Poutre en bois section de 150 × 150 mm, selon la longueur des chevrons. Mauerlat est fixé au mur avec des boulons d'ancrage.
· Après avoir installé le Mauerlat, il est nécessaire d'installer un pilier central, qui servira de support à l'ensemble du système de fermes. Il est fixé à la base à l'aide de pentes de support en bois ou en planches d'une épaisseur de 40 mm ou plus. Il convient de noter qu'avant d'installer la colonne de support dans sa partie supérieure, vous devez fixer le deuxième anneau de support pour les chevrons, en bois.
Lorsque le poteau est installé, vous pouvez procéder à l'assemblage du système de fermes lui-même. Pour sa fabrication, il est plus conseillé d'utiliser des poutres en bois collées. Ce matériau est capable de supporter des charges mécaniques assez importantes, malgré le fait qu'il soit abordable et polyvalent. L'assemblage des chevrons consiste en leur pose et leur fixation aux éléments porteurs. Ceci est fait en utilisant des coins de construction. La distance entre les éléments de support dépend du diamètre du toit, mais ne doit pas dépasser 50 à 70 cm, sinon le système de fermes ne pourra pas remplir ses fonctions de support.

· Si la hauteur du toit est supérieure à deux mètres, un anneau de support supplémentaire est monté, qui soutiendra le toit. Cet anneau est fixé aux chevrons avec des vis autotaraudeuses ou non, et est fixé au poteau avec des entretoises.
Une fois le système de fermes prêt, vous pouvez passer aux étapes suivantes de l'installation. Ajustement supplémentaire matériau d'étanchéité. Vous pouvez le fixer aux chevrons et à la caisse à l'aide d'une agrafeuse.
Après l'imperméabilisation, vous pouvez procéder à l'installation de la toiture.
Comme mentionné ci-dessus, étant donné que le système de fermes d'un toit rond est géométriquement conception complexe, sa conception est mieux confiée à des spécialistes.
Noter! Il vaut mieux payer et obtenir des calculs précis et de haute qualité que d'économiser de l'argent et de faire une erreur, à cause de quoi, après un certain temps, le toit fuira ou même s'effondrera. Ce type de toiture est généralement utilisé pour les maisons rondes ou à plusieurs facettes avec un système de fermes en couches. Pour le support, il y a une course annulaire fixée sur la colonne centrale. La course est montée de manière à ce que le sommet du cône ne soit pas chargé. Le deuxième support est un Mauerlat annulaire, qui est monté le long du mur de la tourelle. Les poutres de plafond doivent être conçues de manière à ce que charge maximaleétait dans la zone du pilier central, auquel, à son tour, la course annulaire de la crête est attachée avec des entretoises. Pour calculer les nœuds du système de chevrons des maisons avec un tel toit, il est préférable de faire appel à des spécialistes

TOIT EN DÔME
Ce type de toit est construit à l'aide d'un système de fermes suspendues. Il s'agit généralement d'un arc à 3 articulations, composé de chevrons suspendus. Une extrémité de l'arc repose sur le mauerlat (posé le long du mur), l'autre extrémité sur l'anneau de support.
Toit en dôme, construction, photo de l'apparence de la version finale - tout cela est sur notre site Web compagnie de construction avec les spécialistes nécessaires.
En plus du type de toit standard, il existe une autre façon de l'organiser. Création d'un dôme formé de triangles. C'est aussi un toit en dôme - un dôme géodésique : une conception avec suffisamment calculs complexes apparence inhabituelle. Pour la fixation des chevrons, des méthodes de connecteur et de non-connecteur peuvent être utilisées. La méthode du connecteur consiste à assembler des triangles avec des pièces de bois et serrures spéciales. La méthode sans connecteur implique la préfabrication de panneaux triangulaires et leur collecte sur le chantier.

Un dôme géodésique présente plusieurs avantages :
· Plus surface utilisable.
Moins de coûts pour les matériaux de construction.
· Économies sur les coûts de chauffage des locaux.
· Possibilité de vitrer tout le dôme.
· Niveaux élevés de charge de neige et de protection contre le vent.
L'isolation phonique est supérieure à celle des autres types de toits.
· Aspect d'origine.
TOIT EN DÔME
Une autre option pour fabriquer un toit avec une base ronde consiste à le construire selon un motif en forme de dôme. Comme dans le cas précédent, sur étape préparatoire il sera nécessaire d'effectuer des calculs et d'établir des dessins détaillés, qu'il est préférable de confier à des spécialistes. Cette approche évitera les erreurs de conception. Mais les travaux de construction eux-mêmes sont tout à fait possibles à effectuer de manière indépendante.
Il convient de dire qu'en termes généraux, le processus de fabrication d'un système de fermes de toit en forme de dôme n'est pas très différent de celui décrit ci-dessus, mais il présente certaines caractéristiques.

· Tout d'abord, l'imperméabilisation est posée sur les murs.
Une fois le Mauerlat installé et réparé.
Puis mettre à la verticale poste de soutien, sur lequel le second anneau de support est monté en partie haute.
Ensuite, vous pouvez procéder à l'installation des chevrons. Pour leur fabrication, des éléments voûtés en bois sont utilisés, composés de plusieurs sections. À une extrémité, l'arc est attaché au Mauerlat, et à l'autre, au deuxième anneau de support au sommet de la colonne de support. Une conception similaire du système de fermes est appelée suspension.
Les arcs de chevrons doivent être installés autour du poteau à une distance d'environ 70 à 90 cm les uns des autres.
Après leur installation, une caisse circulaire de planche non bordée ou un bar.
· Au-dessus du lattage, l'imperméabilisation est posée et, enfin, la toiture.

DÔME GÉODÉSIQUE
Une autre façon de faire un toit "rond" consiste à installer le dôme dit géodésique. Cette technologie est la plus répandue dans les pays occidentaux, en particulier aux États-Unis, mais pour une vision générale, cela vaut la peine de se familiariser avec la technologie.
Ainsi, de manière générale, le processus de fabrication d'un système de fermes utilisant cette technologie consiste dans le fait que les éléments triangulaires du système de fermes sont fabriqués à partir de boiseries qui, lorsqu'elles sont reliées les unes aux autres, forment une base arrondie du toit.

Il convient de noter que la connexion éléments individuels produits à l'aide d'éléments spéciaux appelés connecteurs. En cas d'application, montage conception générale se produit directement au-dessus des murs du bâtiment. Il existe également la méthode de montage dite sans connecteur, dans laquelle des triangles individuels de la structure sont assemblés à l'avance, et leur assemblage en une seule structure se produit plus tard.
Il convient de noter que l'utilisation d'une telle technologie vous permet de construire rapidement la structure nécessaire qui répondra à toutes les exigences nécessaires. exigences opérationnelles, et ont également une apparence plutôt intéressante et originale. Il est également impossible de ne pas noter les avantages suivants:
De plus, à l'intérieur d'un tel dôme un suffisamment grand espace libre, qui peut être utilisé, y compris comme habitation.

Cette conception nécessite moins de matériaux que si d'autres technologies étaient utilisées.
· Le système de dôme géodésique n'est pas très lourd, ce qui signifie qu'il n'augmentera pas considérablement la charge sur les murs et, par conséquent, la fondation, ce qui aura un effet positif sur les économies.
Il faut également souligner les excellentes caractéristiques de résistance de la structure, permettant de faire face à des charges de neige, ce qui est important pour les habitants des régions du nord.
· Entre autres choses, un tel toit aura de bonnes performances en termes d'aérodynamisme, ce qui permet au toit de résister avec succès à de grandes charges de vent.
TOITURE EN OIGNON
Une autre option pour faire un toit sur un bâtiment de forme ronde est le dispositif du soi-disant toit en oignon. Il est à noter que cette forme de toiture est habituellement utilisée lors de la construction d'églises et son utilisation dans la construction privée n'est guère appropriée. Cependant, il faut dire que les cas de la vie sont différents et qu'aucune information ne sera superflue.

De manière générale, la construction d'un tel toit se fait selon la technologie en couches, c'est-à-dire éléments de ferme sont installés et fixés, comme s'ils s'appuyaient contre les supports porteurs, c'est-à-dire le pilier central et le Mauerlat le long du périmètre des murs. La principale différence par rapport aux autres options de fabrication de systèmes de fermes est la forme très spécifique des chevrons eux-mêmes, qui donne au toit un aspect reconnaissable.
Pour atteindre les indicateurs de résistance requis, les chevrons sont en outre renforcés avec système complexe les entretoises et les entretoises, qui sont installées aux endroits les plus sollicités.
En conclusion de ce qui précède, nous pouvons ajouter qu'en principe, vous pouvez construire vous-même un toit, même s'il est rond, mais les calculs nécessaires pour conception appropriée système de fermes est préférable de confier à des spécialistes. C'est peut-être l'essentiel. Les travaux de construction eux-mêmes peuvent être effectués de manière indépendante, bien sûr, sous réserve de la disponibilité de certaines connaissances et pratiques en menuiserie.

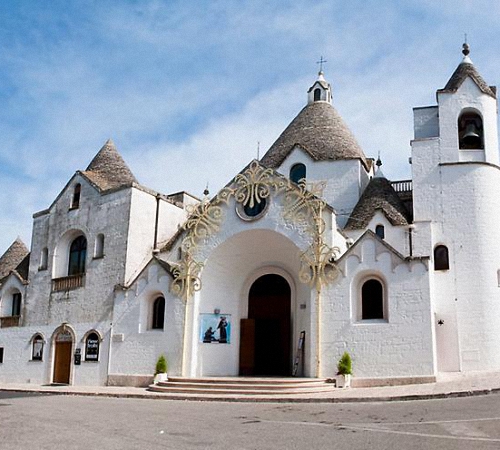
En soi, un toit rond n'est pas si rare. La plupart des monuments architecturaux à vocation cultuelle sont des toits ronds : bulbes des églises russes, dômes des temples musulmans. L'exception est le gothique catholique. En Europe occidentale, les dômes couronnent généralement les bâtiments séculaires.
Le dôme est une option de couverture fréquente pour les bâtiments urbains sur des projets individuels, les bâtiments scientifiques - observatoires, etc. Seulement dans les villages de banlieue, les maisons à toit rond sont rares. La raison en est l'installation complexe du système de fermes. Comment faire un toit rond?
Qu'est-ce qu'un toit rond ?
Appeler le toit rond est faux. Ce n'est pas tout à fait rond.

Ce groupe comprend tous les toits dont la forme est une figure de rotation ou l'un de ses segments :
§ Dôme (moitié ou tiers supérieur du ballon) ;
§ Toits coniques;
§ Toits bulbeux;
§ Toits curvilignes à géométrie complexe qui n'ont pas leur propre nom.
Le système de fermes pour tous ces types de toits est fabriqué de différentes manières.
La conception du système de fermes d'un toit rond
Remarque
Les systèmes de chevrons pour les toits ronds sont généralement en couches. Cela implique la présence de supports supplémentaires pour les chevrons à l'intérieur de la structure.

Points d'assistance :
§ Ring Mauerlat;
§ Course annulaire dans la partie supérieure du toit. Si le toit est haut (supérieur à deux mètres), il peut y avoir plus d'une piste ;
§ Pilier central. Pour les petites structures, une seule suffit ;
§ Éléments de renforcement supplémentaires (entretoises, coupleurs).
Les chevrons eux-mêmes :
§ Pour les ampoules - arrondies (souvent des fermes métalliques sont utilisées à la place du bois).
§ Pour les dômes - en arc arrondi, composé de plusieurs parties. L'exception est la soi-disant. dôme géodésique, populaire dans les pays occidentaux : il est assemblé à partir de nombreuses petites sections de bois triangulaires.
§ Cone - les jambes de chevron sont droites, basées sur des pistes annulaires rondes et un Mauerlat rond. Le nœud faîtier au sommet est monté de la même manière que les toits en croupe.

L'ordre d'installation du système dans son ensemble est similaire à l'installation de toits conventionnels:
1. Pose d'une couche isolante de feutre de toiture sur le mur.
2. Installation du Mauerlat. Par exemple, une barre 15 par 15 (la section doit être indiquée dans le projet de toiture). Le Mauerlat est fixé au mur avec des boulons d'ancrage.
3. Si tout le bâtiment est en bois, ne mettez pas de Mauerlat. Les chevrons reposent sur la couronne supérieure et sont fixés avec des clous galvanisés.
4. Montez la course annulaire supérieure sur la poutre pour le poteau de support.
5. Placez un poteau de support au centre du sol. Renforcé avec des entretoises d'environ 4 cm d'épaisseur.
6. Installez les chevrons par incréments de 50 à 90 centimètres, selon le projet. Ils sont fixés au Mauerlat et à la piste avec des angles de construction.
Remarque
L'exigence générale pour l'installation du système de fermes de tout toit: prétraitez tous les éléments avec des retardateurs de feu et des antiseptiques.

Installation sur toit rond
Après l'installation des chevrons, une tarte de toiture est installée - comme pour les autres toits en pente :
§ Pare-vapeur;
§ Isolation ;
§ Imperméabilisation ;
§ Contre-treillis + caisse.

Vous pouvez vous limiter à une étanchéité (sans pare-vapeur ni isolant) si la toiture est froide. Mais grenier chaleureux il est tout à fait possible d'aménager dans le dôme, il y a suffisamment d'espace là-bas. Ou votre propre observatoire

La couverture des toits ronds peut être faite de différents matériaux:
§ dalles souples ;
§ tôles d'acier minces (y compris les toits à joints);
§ avec certaines restrictions - carreaux de céramique;
§ revêtements de pièces en bois - bardeaux, bardeaux, etc.;
§ Polycarbonate.
La pose de l'un de ces matériaux est effectuée conformément aux instructions.

Remarque
L'installation de dalles souples n'est pas difficile, mais pour le fer, une machine à cintrer et / ou un équipement de laminage des joints peut être nécessaire.
Si vous envisagez de faire un toit à partir de la composition tuiles en bois, n'oubliez pas de les traiter avec tout le nécessaire composés protecteurs et vernis imperméable.
Caractéristiques d'un toit rond en polycarbonate
Le polycarbonate se distingue dans un certain nombre de matériaux de toiture. Les toits de celui-ci sont souvent construits près des serres, des serres, des tonnelles, des jardins d'hiver. Dans tous les cas, ce sont des toits transparents ou translucides, ils n'ont pas de tarte de toiture.

Mais le polycarbonate lui-même a une faible conductivité thermique. Le bâtiment n'est pas complètement froid, même en l'absence d'isolation.
Lors de l'installation, vous devez prendre en compte les caractéristiques du matériel:
1. Percez des trous pour les fixations à l'avance. Lors du perçage et de la découpe, soyez prudent, évitez les vibrations des tôles, car. le matériau a tendance à se fissurer.
2. Convient pour couper des feuilles scie sauteuse électrique ou une circulaire petite dent. La vitesse est moyenne : à faible vitesse, des copeaux apparaissent, une vitesse élevée peut entraîner la fusion du matériau.
3. Lorsque l'humidité s'accumule à l'intérieur des feuilles, elles sont soufflées air comprimé(par exemple, avec un aspirateur).
4. Le polycarbonate est sujet à la dilatation thermique. Les trous de montage doivent être plus grands de quelques millimètres que le diamètre de la tige filetée.
5. Les extrémités des flans feuilles de polycarbonate avant la pose, vous devez le coller avec du ruban adhésif aluminium étanche.

6. Pour l'installation d'un toit en polycarbonate, des profilés métalliques arqués sont utilisés. L'installation est effectuée le long du rayon. Le cadre se construit progressivement, au fur et à mesure que les feuilles elles-mêmes sont attachées.
7. film protecteur des tôles ne sont retirées qu'à la fin de l'installation.
8. Les tôles peuvent être formées curvilignement par formage thermique, sous vide et à froid.
9. Il est impossible de se déplacer sur le revêtement, lors de l'installation, ils sont utilisés échelles de toit et échelles.
L'installation d'un toit rond est un processus complexe et énergivore. Une petite erreur peut tourner Beau design en quelque chose d'informe.
Le toit en arc ou en dôme est principalement utilisé dans la construction de bâtiments tels que les jardins d'hiver, les piscines, les galeries et les stades. Mais on trouve de plus en plus souvent des toits voûtés dans la construction de chalets, où la conception du bâtiment vous permet de monter ce type de toit. Le toit en dôme est très impressionnant au-dessus du hall ou au-dessus du grenier, qui est équipé pour la détente.

Description de la conception
Les toits en dôme ont une structure en treillis particulière ; le bois, le béton ou le métal sont utilisés pour leur fabrication, et parfois tous ensemble. En règle générale, le revêtement des dômes arqués est constitué de matériaux translucides: verre spécial, polycarbonate, ardoise transparente. Mais parfois, des matériaux non transparents peuvent être utilisés : cuivre, zinc, tôles revêtues de titane ou bois.
Les toits en dôme présentent de nombreux avantages par rapport aux conceptions standard connues. Attrait esthétique, un tel toit est vraiment original et incroyablement beau. La forme de l'arc ou du dôme rend ces toits très résistants aux charges de vent et de neige, car la neige ne s'attarde pas sur un tel toit. Grâce à un matériau de toiture transparent, les locaux reçoivent un éclairage naturel à part entière, très précieux pour les jardins d'hiver. Techniquement, le toit en dôme élimine de nombreux problèmes, vous pouvez couvrir plusieurs pièces en même temps et effectuer une seule transition en douceur.

Structure en arc ou en dôme
Les éléments porteurs en treillis de ces structures ont un aspect courbe tel qu'un treillis ou un arc, ils sont en métal, en béton et en bois. Par exemple, pour un immeuble privé de faible hauteur, les charges lourdes ouvrages en béton ne sont pas utilisés, donc le métal et Sol en bois. Si le bâtiment est grand, la charge des fermes en béton armé est immédiatement prise en compte lors de la construction, de sorte que les murs et les fondations sont particulièrement solides.
Il convient de dire qu'il existe des toits en dôme d'une petite surface, dans la construction desquels les supports ne sont pas du tout utilisés, le revêtement de ces toits est en polycarbonate durable et en même temps léger. Ses propriétés vous permettent de réaliser une grande variété de formes de toit.
Les structures de support métalliques sont également très lourdes et doivent être traitées régulièrement pour éviter la corrosion. De plus, une grande structure métallique crée une forte charge sur les murs et les fondations. Par conséquent, récemment, les profilés en aluminium ont été de plus en plus utilisés dans la construction de toits en dôme et en arc. L'aluminium est très léger et en même temps solide, ne se corrode pas et les faisceaux fins sont en harmonie avec le matériau translucide. L'installation des supports de ferme est grandement simplifiée et devient plus facile.

Caisse
Avec un cadre en aluminium, la même caisse en aluminium est installée, son pas est calculé en tenant compte de l'épaisseur et du poids des feuilles de polycarbonate. La flexion de la tôle est également prise en compte, elle crée également une charge. Cependant, la caisse ne se fait pas ici avec des étapes fréquentes, en règle générale, un cavalier est placé sur le sol de la feuille. Voici les principaux paramètres du lattage à prendre en compte lors de l'installation du lattage des toits en dôme:
Il faut tenir compte de la taille du polycarbonate et de son type. Si du polycarbonate cellulaire est utilisé, sa longueur est de 6 à 12 mètres, la largeur est essentiellement de 2,10 mètres standard;
- le polycarbonate de type feuille a des dimensions plus petites, longueur 3 m, largeur 2 m, mais ici l'épaisseur de feuille de 10-32 mm peut modifier considérablement le poids;
- vous devez également clarifier toutes les caractéristiques du polycarbonate, car les feuilles et les nids d'abeilles sont souvent fabriqués selon commande personnalisée et cela doit être pris en compte;
- pour l'installation d'une ossature et d'un lattage en aluminium, il est nécessaire de créer le plus complet et dessin précis en tenant compte de toutes les petites choses, alors seulement vous pourrez procéder à l'installation;
- le polycarbonate et l'aluminium n'ont pas besoin de finition supplémentaire, ils se marient bien et créent un style original.
A voir de près bon choix polycarbonate, une variété de types et d'épaisseurs vous permet de sélectionner de manière optimale matériel désiré, l'essentiel est de calculer correctement le poids de la structure. sur les toits petite taille, il est possible de créer une structure en dôme sans utiliser de cadre, ce qui rend le toit particulièrement beau et aéré.

Mais il convient de rappeler que le polycarbonate, lorsqu'il est exposé au soleil, crée un effet de serre, surtout avec une grande zone de couverture. Pour les pièces recouvertes d'un dôme en polycarbonate, il est nécessaire d'installer une climatisation ou une ventilation.
Feuille de fixation et polycarbonate cellulaire
Une bonne fixation joue un rôle important dans la résistance structure en dôme en polycarbonate, il existe différentes méthodes fixations pour matériau en nid d'abeille ou en feuille. Il est nécessaire de prendre en compte les capacités de flexion du polycarbonate et son épaisseur, ainsi que de prendre en compte les canaux internes complets qui doivent aller dans le sens longitudinal. Vous devez également vous rappeler de la dilatation thermique nécessaire pour les feuilles lorsqu'elles sont chauffées.
Souvent, pour les feuilles taille moyenne, pas plus de 3 m, s'applique point de vue monte. N'utilisez pas de boulons ou de clous ordinaires pour la fixation, sinon le polycarbonate se fissurera lors de l'expansion. Si les feuilles de revêtement mesurent jusqu'à 6 m, il est nécessaire d'utiliser en plus des rondelles thermiques. Mais avec des feuilles jusqu'à 12 m, cela n'aidera plus, il est donc recommandé d'utiliser du polycarbonate spécial formé à chaud et doté de raidisseurs. Les feuilles sont pressées de l'extérieur, des rails en polycarbonate ou d'autres matériaux sont utilisés comme pinces.
Il est conseillé de mettre un joint entre le polycarbonate et les joints avec la surface de la structure en treillis afin que les taches d'oxydation n'apparaissent pas. Cependant, si vous utilisez un profilé en aluminium, il est déjà recouvert d'un mastic spécial en caoutchouc ou en silicone au stade de la production.