
Comment faire un parquet en bois chaleureux. Plancher à eau chaude et plancher en bois : ces concepts sont-ils compatibles Construction de planchers chauffants en bois
La plupart des gens pensent qu’un système de « plancher chaud » n’est pas nécessaire pour revêtements en bois. Cela est principalement dû aux avantages suivants matériau naturel comme la légèreté et de bonnes propriétés isolantes. De plus, l'installation est difficile en raison de la déformation possible du bois naturel due aux changements de température et d'humidité. Cependant, aujourd'hui, une solution a déjà été trouvée au problème de la combinaison d'un revêtement en planches avec système moderne chauffage au sol.
Les planchers chauffants à eau sans chape sont aujourd'hui utilisés assez souvent. Un socle en béton est certes fiable, mais il ne peut pas être installé dans toutes les pièces. C’est dans ces cas qu’un système alternatif de plancher chauffant est utilisé. L'installation de telles structures est plus facile que la conception d'une chape et, en fonctionnement, elles ne lui sont en aucun cas inférieures.
Système de chauffage au sol sans chape
Si la maison est construite en bois, dans les pièces plafonds bas, exécution chape en béton peut en outre « capturer » un espace déjà réduit. De plus, la pose d'une base en béton est un travail fastidieux et fastidieux. Dans ce cas solution idéale vous aurez un plancher chauffant à eau dans maison en bois de vos propres mains.
Un plancher d'eau sans socle en béton se pose sur un revêtement en bois ou en polystyrène. Les tuyaux sont posés dans des évidements spéciaux. Pour une meilleure répartition air chaud installer des plaques métalliques spéciales. Le système de canalisations posé est recouvert d'un matériau imperméabilisant sur le dessus et un revêtement de finition y est appliqué.

Système de canalisations pour planchers chauffants en bois
Avantages des planchers chauffants à l'eau
Ayant une faible épaisseur, ce système permet d'économiser surface utilisable chambres. La structure peut être facilement installée sur tout type de sol. Dans ce cas, immédiatement après l'installation, vous pouvez effectuer une finition de surface.
Quelques fonctionnalités d'installation
Le mécanisme de fonctionnement du système de chauffage par le sol implique le transfert d'énergie du liquide de refroidissement vers le matériau situé au-dessus et le revêtement de finition. Ensuite, le sol, en chauffant, libère de la chaleur dans la pièce.

Pose de plancher chauffant à eau
Si le sol est recouvert d'une chape en béton ordinaire, ce principe fonctionne très bien. Toutefois, dans le cas où les conduites posées et remplies d'eau ou d'éthylène glycol ne sont pas entourées de socle en béton, UN bois naturel, matériau naturel empêche le transfert de chaleur. Bien entendu, il est possible d'installer des planchers chauffants à eau sur un parquet, mais ces nuances doivent être prises en compte. Le bois ne permettra toujours pas à toute l’énergie générée par le chauffage de passer sous terre, mais le chauffage intérieur pourrait ne pas être aussi efficace.
Malgré cela, la chape en béton traditionnelle n'est pas meilleure solution problèmes, car une épaisse couche de béton exercera une pression sur le plancher en planches. Même si pendant la construction conception fiable, bois naturel peut ne pas être capable de supporter de lourdes charges. De plus, il est souvent nécessaire d'équiper une salle de bain ou un bain public dans une maison en bois en installant des sols chauffants dans de telles pièces, et il n'est pas conseillé de réaliser une fondation trop solide et trop massive dans de telles pièces.

Plancher chauffant à l'eau
Pas moins facteur important Ce qui complique l'installation du système, c'est la présence d'un support, qui doit être posé sur un parquet en bois. Basé sur des matériaux de substrat différents types isolation, qui empêchent également le libre passage de la chaleur. Cependant, tous les aspects négatifs de l’installation peuvent et doivent être pris en compte et la tâche accomplie avec succès. Donc, si vous souhaitez savoir comment réaliser un plancher chauffant à l'eau sur parquet, vous devez être patient et étudier attentivement la technologie d'installation avancée spéciale.
Autres caractéristiques de conception
Le système de chauffage par le sol sera léger. Chauffée par la canalisation, la structure transfère la chaleur au revêtement en totalité et indirectement aux utilisateurs. Lors de l'installation, le support doit être posé sous un revêtement de sol en linoléum, une moquette ou des carreaux de céramique si le sol est posé dans la salle de bain.
La mise en place d'un tel système ne prendra pas beaucoup de temps. Lors de la pose, il n'est pas nécessaire d'attendre 28 jours pour que la chape durcisse.

Pose de plancher chauffant à eau sur support bois
Assurer le chauffage
Plancher chauffant généralement à l'eau socle en bois prêt à l'emploi presque immédiatement après l'installation revêtement de finition. Un autre avantage de cette conception est qu'il est facile de réparer les zones du revêtement présentant des défauts et des dommages mineurs. A noter que la présence d'une chape en ciment complique le processus de restauration.
Méthode de pose
Il existe une technologie commune que vous devez maîtriser si vous êtes intéressé par la question de savoir comment fabriquer un sol chaud dans une maison en bois. Un système de plancher chauffant à eau pour parquet est installé selon la méthode du revêtement de sol.
Les tuyaux dans lesquels circule du liquide de refroidissement ne sont pas posés dans une chape en béton, mais sur des rondins ou une base brute de planches dans des canaux spécialement équipés.

Installation d'un système de plancher chauffant à eau
Afin que la chaleur s'accumule et se répartisse correctement, des plaques spéciales avec des évidements longitudinaux pour la canalisation du circuit de chauffage sont renforcées dans les canaux.
Les plaques métalliques remplissent non seulement la fonction de transfert de chaleur, mais rendent également la structure plus rigide, ce qui permet de se passer de substrat.
Si vous effectuez l'installation vous-même, vous n'êtes pas obligé d'acheter des plaques coûteuses, mais utilisez plutôt une feuille de 200 microns d'épaisseur. Parfois lors de la finition du sol carrelage ou lors de la pose de linoléum, la présence d'un substrat est souhaitable. Pour ce faire, vous devrez acheter des plaques de panneaux de fibres de gypse ou des panneaux de particules liées au ciment avec les valeurs d'isolation les plus basses.
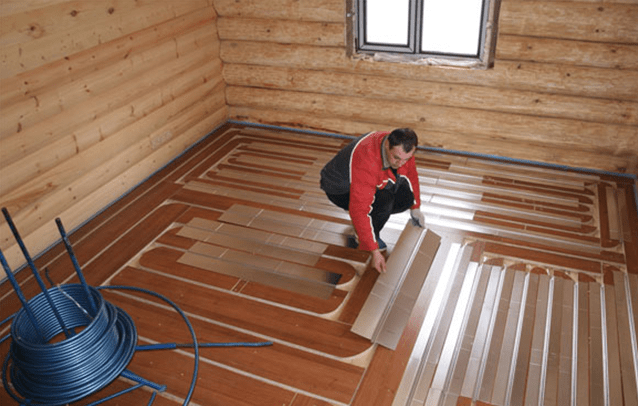
Nous posons des tuyaux pour le système de plancher d'eau
Cela peut être fait de deux manières. Leurs différences résident dans la conception des canaux pour placer les tuyaux. En règle générale, des technologies d'installation basées sur des modules ou des rails sont utilisées.
Pour la première option, vous devez acheter des modules spéciaux en panneaux de particules prêts à l'emploi. Des évidements y sont déjà découpés à une certaine distance les uns des autres. Ces intervalles dépendent du transfert de chaleur attendu du système.

Installation modulaire de planchers chauffants à eau
En règle générale, le kit d'un tel système modulaire comprend tout le nécessaire : les modules eux-mêmes avec des rainures, des plaques métalliques, des fixations et des tuyaux. Il ne reste plus qu'à assembler la structure conformément au schéma fourni avec le produit. Cependant, un revêtement de sol modulaire n’est pas bon marché. Par conséquent, beaucoup préfèrent une alternative - la méthode économique à crémaillère et pignon.
Il ne s'agit pas d'équipement de chaînes dans feuilles de panneaux de particules, et emballer les lattes. Les planches sont découpées dans des planches ou du contreplaqué. Les espaces entre eux doivent être égaux à l'épaisseur des lattes, car dans les rainures formées, les tuyaux dont le diamètre extérieur est de 17 mm doivent non seulement s'insérer librement, mais aussi ne pas être détruits par le déplacement du bois. La largeur des bandes de guidage dépend de la distance entre les tuyaux dans la structure en cours de fabrication. Ainsi, avec la méthode « serpent » de pose de tuyaux au pas de 300 millimètres, une planche de 22 mm doit avoir une épaisseur de 278 mm.

Schéma de pose des racks
Méthode mixte d'installation de planchers chauffants en bois
Certains artisans préfèrent utiliser une autre méthode d'installation, qui se situe entre une option rack et une option modulaire. De cette façon, vous pouvez installer des planchers chauffants facilement, rapidement et sans dépenser une somme d’argent importante.
Commencez par sélectionner planche bordée quartiers avec dimensions de canal. Après avoir mesuré au moins sept centimètres du mur, utilisez un cutter pour réaliser une bande ou un évidement afin que le tuyau soit connecté à la rangée suivante. L'épaisseur de la planche doit dépasser les paramètres d'échantillonnage et la largeur doit être égale au pas lors de l'installation. Il n'est pas nécessaire de poser une base brute et les planches sont fixées aux solives à l'aide de vis autotaraudeuses.
Installation d'une structure chauffante sur un sommier à lattes léger
Si vous posez le système sur un vieux parquet, vous devez inspecter soigneusement le sol avant de commencer les travaux. Il est préférable de soulever les lames de parquet, de vérifier l'état des solives et, si nécessaire, de restaurer ou de remplacer les éléments structurels usés et endommagés. Il est parfois nécessaire de le clouer aux poutres du sol poutres en bois et ajoutez une isolation supplémentaire.
La prochaine étape consiste à poser l'isolation.

Le processus de pose de l'isolation thermique
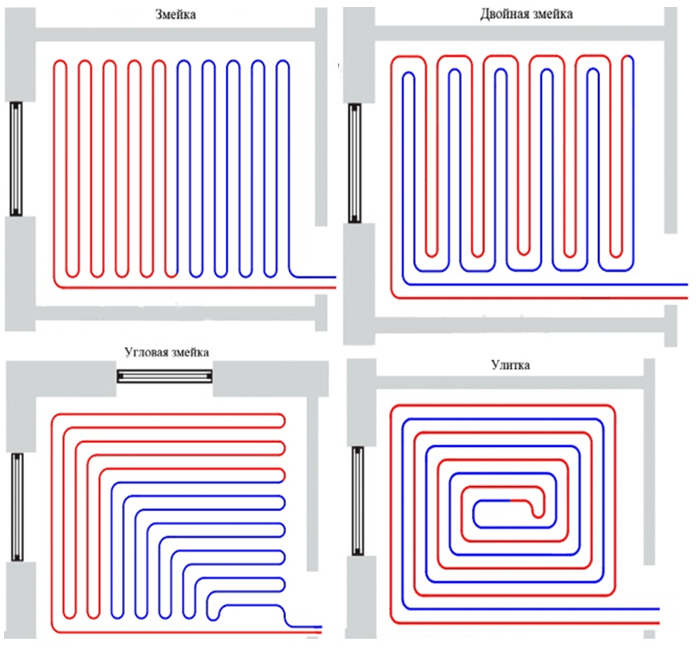
Le polyéthylène, disposé en chevauchement, convient pour cela. Un ruban amortisseur d'une largeur de 5 centimètres est fixé au mur le long du périmètre du revêtement de sol. Pour installer un plancher chauffant avec un circuit d'eau, il est pratique d'utiliser la méthode « serpent » de pose des canalisations.
Sur un plan pré-dessiné de la pièce, nous marquons la zone où les tuyaux sont alimentés et où sont fixés les équipements pour régler le système, nous devons également dessiner la position des guides avec les dégagements nécessaires ; Il s'agit généralement de 150 à 300 millimètres. Il est préférable d'utiliser des tuyaux ondulés d'un diamètre de 16 millimètres. Les lattes sont réalisées selon les dimensions.

Méthode de pose de tuyaux serpent
Ensuite, nous réparons les guides pour sous-plancherà l'aide de vis autotaraudeuses. Les coins des bandes dans les zones de cintrage des tuyaux doivent être arrondis. Une feuille d'une épaisseur d'au moins 50 microns est placée dans les rainures préparées. En appuyant légèrement et en pliant doucement autour de l'évidement, nous le réparons. En plusieurs points, vous pouvez fixer le matériau aux lattes à l'aide d'une agrafeuse.
Si les tuyaux du système sont également enveloppés de papier d'aluminium, le transfert de chaleur de la structure peut être légèrement augmenté.
Nous posons les tuyaux dans les canaux formés. Des plaques métalliques sont également utilisées pour la fixation au sous-plancher. Ensuite, un raccordement est effectué au circuit de chauffage et le système de chauffage est mis sous pression. Après avoir vérifié le fonctionnement normal du plancher d'eau, vous pouvez immédiatement procéder à la finition du carrelage ou à la pose d'un support, si nécessaire. Quant aux matériaux de substrat, il est recommandé d'utiliser des cartes DSP qui ne contiennent pas de formaldéhyde.
La méthode de chauffage des bains publics en faisant circuler de l’eau chauffée « sous les pieds » était utilisée dans l’Antiquité par les Turcs et les Romains. La méthode « souterraine » n’était pas nouvelle, mais elle n’était pas suffisamment étudiée et développée. Pendant longtemps Ils estimaient qu'il était inutile d'installer un système de plancher chauffant sur un parquet en bois en raison des propriétés spécifiques des matériaux de construction naturels. Les principaux avantages du bois - excellentes qualités isolantes et légèreté - ont été reconnus comme un frein. La difficulté était due aux mouvements caractéristiques de la matière organique provoqués par les fluctuations de la température ambiante et les changements des niveaux d'humidité. La difficulté de combiner des planchers chauffants à eau avec une base en bois nous a obligés à trouver une « issue » technologique qui garantirait leur syndicat.
Vidéo sur le système de chauffage par le sol
À quoi devrez-vous faire face pendant les travaux ?
Le principe de fonctionnement de la famille de conception « sol chaud » repose sur le transfert de l'énergie du liquide de refroidissement à travers le matériau environnant jusqu'au revêtement de sol. Le plancher chauffant transfère ensuite la chaleur dans la pièce. Une chape en béton traditionnelle entourant des tuyaux traversés par de l'eau ou une solution d'éthylène glycol remplit bien cette fonction. On ne peut pas en dire autant du bois, qui empêche la propagation de l’énergie thermique. Bien entendu, il ne permet pas à l'énergie générée lors du chauffage de passer dans le sous-sol, mais il n'est pas non plus pressé de la donner aux utilisateurs.
Question : pourquoi ne pas simplement le remplir d'une chape en béton alors ? parquet? Réponse : alors environ 300 kg de couche de béton s'appuieront sur 1 m² de parquet. Il ne fait aucun doute que le bois ne peut pas supporter une charge aussi lourde, même si la structure des poutres était extrêmement fiable, comme pour un bain russe ou maison en rondins ce n’est pas sage de le faire.
Un autre problème est la sous-couche, sans laquelle il n'est pas habituel de poser du parquet sur un parquet. La plupart des matériaux utilisés comme substrat appartiennent également à la catégorie des matériaux isolants qui créent une barrière au passage de la chaleur.
L'ensemble des problèmes et des obstacles seront éliminés grâce à la technologie améliorée selon laquelle les planchers en bois chauffés à l'eau sont désormais construits. Grâce aux fonctionnalités de son appareil :
- le poids de la structure de chauffage « souterraine » a été réduit d'un ordre de grandeur ;
- la chaleur reçue des tuyaux de chauffage est entièrement transférée au revêtement de sol et indirectement aux utilisateurs ;
- la sous-couche est posée uniquement sous de la moquette, du linoléum ou du carrelage ;
- la période d'accord a été extrêmement raccourcie ;
- Le délai d'attente de 28 jours nécessaire au durcissement complet de la chape est exclu.
Après l'installation revêtement de finition au-dessus d'un plancher chauffant à eau construit avec un système en bois, vous pouvez commencer à l'utiliser immédiatement. Un avantage important est la possibilité de réparer et de remplacer les zones endommagées sans problèmes importants, ce qui est totalement irréaliste avec une chape en ciment.
Caractéristiques de conception d'un système d'eau en bois
Conçu spécifiquement pour les bâtiments de banlieue avec planchers à poutres systèmes en bois le plancher chauffant à eau est posé selon une méthode de pose unique :
- la canalisation avec le liquide de refroidissement en circulation n'est pas située dans chape en ciment, et est monté sur des solives ou des planchers en sous-planchers dans des canaux spécialement formés ;
- pour l'accumulation et le transfert de chaleur, les canaux sont équipés de plaques de répartition de chaleur avec un évidement longitudinal pour la pose des tuyaux du circuit de chauffage ;
- les plaques métalliques, ainsi que la fonction de répartition de la chaleur, servent d'éléments qui augmentent la rigidité de la structure, éliminant ainsi le besoin d'utiliser un substrat.
Veuillez noter. Dans le budget choix faits maison Au lieu de plaques coûteuses, on utilise une feuille d'une épaisseur de 200 microns.
Si un support est encore nécessaire, par exemple pour finir un sol avec des carreaux de céramique ou du linoléum, des panneaux de fibres de gypse (GVL, GVLV) ou des panneaux de particules liées au ciment (CSP) avec des propriétés isolantes minimales sont utilisés.

Deux options technologiquement différentes à choisir
Toutes les différences résident dans la méthode de formation des canaux pour l'emplacement du pipeline, d'où la division en deux méthodes :
- Pour la pose de planchers chauffants solives en bois Vous pouvez désormais acheter des modules spéciaux en panneaux de particules avec des « rainures » pré-fraisées en usine, dont l'espacement est déterminé par le transfert de chaleur prévu du système. Le kit d'usine est livré complet avec tous les composants : modules avec canaux existants, plaques métalliques de distribution de chaleur, fixations et tuyaux. Il suffit de les assembler conformément aux instructions de projet ci-jointes. Un inconvénient important des revêtements de sol modulaires en panneaux de particules est leur coût, parfois équivalent au prix d'une maison en rondins. Parce que rusé artisans folkloriques, sur la base des développements en usine, une alternative bon marché à crémaillère et pignon a été inventée.
- L'option crémaillère prédétermine la formation des canaux sans fraisage panneaux de particules, mais en rembourrant les lattes. Pour fabriquer les lattes, utilisez des planches rabotées bordées, du contreplaqué résistant à l'humidité ou les planches mentionnées ci-dessus d'une épaisseur d'au moins 21 mm, maximum 28 mm. La distance entre les lattes est généralement égale à l'épaisseur des lattes, car dans les rainures créées par le rembourrage, les tuyaux d'un diamètre extérieur de 17 mm doivent non seulement reposer librement, mais aussi ne pas être déformés par les mouvements du bois. La largeur des rails de guidage est déterminée par la distance entre les canalisations du circuit en construction. Par exemple, lors de la pose d'un pipeline en serpent avec un pas de 300 mm, la largeur d'une planche de 22 mm doit être de 278 mm.

Il y en a un autre plein d'esprit technologie populaire- une sorte d'hybride de principes rackables et modulaires. Selon celui-ci, la pose de planchers chauffants selon poutres en bois Il est produit assez rapidement et de manière très économique.
Pour ce faire, sélectionnez un quart aux dimensions du canal sur un côté de la planche bordée. A une distance d'au moins 7 cm du mur, une bande continue est fraisée à une profondeur équivalente afin que le tuyau puisse être amené à la rangée suivante. L'épaisseur de la planche doit naturellement être taille plus grandeéchantillons, mais la largeur de la planche dans ce cas est égale au pas de pose. Les planches avec canaux sont fixées à l'aide de vis autotaraudeuses directement sur les poutres ou les solives, car il n'est pas nécessaire de construire un sous-plancher.
Installation du système sur un sol en caillebotis clair
Avant de construire un plancher chauffant sous un parquet usagé, il est nécessaire de vérifier soigneusement l'état de tous les éléments. Il est conseillé de démonter les lames de plancher et d'inspecter les solives et, si nécessaire, de remplacer les composants douteux. Si la structure n'était pas suffisamment isolée jusqu'aux poutres ou aux solives au niveau de la ligne de fond, il faudra clouer les barres et poser des dalles d'isolation dessus. Ensuite, vous devez poser un isolant matériau en rouleau avec un chevauchement (de préférence en polyéthylène 200 microns) et fixez un ruban amortisseur de 5 cm de large au mur le long du périmètre du sol.
Ceux qui veulent savoir comment réchauffer un parquet en installant un circuit d'eau ont probablement compris que le plus option simple la pose du pipeline sera un serpent. Sur un plan réalisé en fonction des dimensions de la pièce, nous marquerons l'emplacement de raccordement des canalisations et d'installation des équipements de contrôle, et tracerons l'emplacement des guides avec le pas requis. Pour nos latitudes, le pas entre tuyaux varie de 150 mm à 300 mm. Il est recommandé de prendre des tuyaux ondulés d'un diamètre de 16 ou 17 mm. Sur la base des données obtenues, nous calculons les dimensions des lattes et les réalisons.

Le socle est préparé, les lattes sont préparées - vous pouvez commencer l'installation :
- conformément au projet personnel, nous posons les guides préparés, entre lesquels nous laissons une rainure pour les tuyaux ;
- nous fixons les guides avec des vis autotaraudeuses à la base rugueuse ;
- Nous arrondissons les coins des lattes dans la zone de retournement du pipeline ;
- Nous plaçons une feuille d'une épaisseur d'au moins 50 microns dans les canaux créés par cette méthode, la pressons en la pliant soigneusement autour de l'évidement et la fixons par endroits aux lattes avec une agrafeuse ;
Conseil. Pour augmenter le transfert de chaleur, les artisans recommandent d'envelopper en outre les tuyaux eux-mêmes avec du papier d'aluminium.
- Nous posons un pipeline le long des sillons formés et le sécurisons périodiquement plaques de métal au sous-plancher ou aux lattes ;
- se connecter au circuit de chauffage et effectuer un test de pression du système de chauffage ;
- Une fois convaincus de sa fonctionnalité, nous posons immédiatement soit le revêtement de sol, soit un support sous le carrelage ou le linoléum, pour lequel des panneaux DSP sans formaldéhyde sont fortement recommandés.

C'est ainsi que vous pouvez construire vous-même des planchers chauffants à eau sans frais supplémentaires et un fanatisme inutile. Les principes introduits par les ingénieurs occidentaux peuvent être utilisés dans la pratique, en laissant l'argent dans votre propre portefeuille. Qu'est-ce qui est préférable : un « designer » d'usine très cher ou un produit fait maison abordable ?
Les historiens affirment que le premier plancher chauffant est apparu en Rome antique, cependant, à l'époque, ce n'était pas aussi parfait qu'il peut l'être aujourd'hui. Prenant l'idée comme base, les designers modernes l'ont perfectionnée. L'installation d'un système « plancher chaud » est un système déjà éprouvé et testé à plusieurs reprises. Pour le mettre en œuvre, il vous suffit de suivre correctement les instructions. Certes, il existe certaines caractéristiques d'installation, de connexion et de fonctionnement du système dans des conditions non standard. Ce dernier comprend également l'installation d'un plancher à eau chaude sur solives de bois.
Maison en bois et plancher chauffant
La présence d'un système de « plancher chaud » fournira à tout, y compris chambre en bois un chauffage uniforme, l'absence probable de piles et, bien sûr, la possibilité de se déplacer sur le sol par tous les temps en dehors de la fenêtre, même pieds nus ou en rampant (ce qui est plus pertinent pour les petits enfants).
Sol chaud, où le caloporteur est de l'eau qui, lorsqu'elle est chauffée, se déplace le long du sous-sol posé revêtement supérieur Les tuyaux sont appelés plancher chauffant à eau. Théoriquement, les tuyaux doivent être placés sur n'importe quelle surface plane, après l'avoir préalablement recouverte d'un réflecteur de chaleur afin que ce dernier aille exclusivement vers le haut.
S'il est nécessaire de réaliser la construction de ce système sur des rondins de bois, vous devez alors connaître les éléments suivants :
- Il est impossible de remplir une structure à base de rondins de bois avec une chape traditionnelle dont la hauteur est d'environ 5 centimètres. L'arbre ne supportera pas le poids du béton.
- Pour renforcer la base du système « plancher chaud », à savoir la bûche, vous devez poser dessus des feuilles de métal mince (une épaisseur de 2 millimètres suffira). Dans ce cas, le métal servira également de réflecteur de chaleur.
- S'il existe une telle possibilité, afin de rendre un plancher chauffant non seulement chaud, mais aussi économique, vous aurez besoin de chaque tour de tuyau à travers lequel il doit circuler. eau chaude, poser directement dans les solives. Dans ce cas, vous devrez également utiliser des réflecteurs de chaleur et des matériaux isolants.
Lors de l'élaboration d'un schéma, il convient de prendre en compte la surface au sol, la hauteur du plafond ainsi que la manière dont le système sera chauffé.
Calculs thermiques
Plus la chape est haute, plus la distance entre les spires des tuyaux de chauffage dans le sol doit être réduite. Il convient également de prendre en compte un facteur tel que la perte de chaleur. Leur taille dépend
- l'emplacement de la maison par rapport à la lumière,
- nombre de fenêtres et leur taille,
- isolation murs porteurs et les toits.
Naturellement, le calcul d'un plancher chauffant doit prendre en compte l'intensité d'utilisation maison en bois (option de pays ou une vie bien remplie) et, bien sûr, conditions climatiques dans lequel se trouve cette maison.
Si le bâtiment est ancien, avant de commencer le chauffage, il est préférable de tester la résistance de la maison, ainsi que les fissures/courants d'air, puis de procéder à une isolation maximale. Si la maison est construite à partir de zéro, les problèmes d'économie d'énergie doivent être résolus immédiatement pendant la construction.
Du fait vieille maison ou neuf et vous devez choisir des options pour le chauffage au sol à eau.
Sélectionnez l'option souhaitée
Comment installer un sol chaud sur des bûches ne peut être déterminé qu'après les avoir testés. S'il y a des retards
- installé sur un socle en béton,
- eux-mêmes sont assez forts
- et entre eux, il y a une distance dans laquelle s'insérera le tuyau pour le chauffage au sol,
alors vous pouvez suivre l'option, que nous désignons par le numéro 1.
S'il y a des retards
- situés à proximité les uns des autres,
- parmi eux, il y a ceux qui se plient lorsqu'on les appuie,
ensuite le système « plancher chaud » sera installé selon l’option 2.
Les deux, si les paramètres sont correctement respectés, réchaufferont bien la pièce. Les deux ne se feront pas sans préparation préalable.
Option 1
Ce système de chauffage par le sol demande beaucoup de main d’œuvre. Peut-être que je vais grandement contrarier quelqu'un maintenant, mais si tout est fait avec cervelle et pendant des siècles, alors les retards doivent être supprimés. Oui! Complètement et proprement. Ils serviront parfaitement de base aux serpentins de tuyaux et feront bien partie d'un système réfléchissant la chaleur.
1. Les journaux ont été supprimés. La surface en dessous d'eux a été nivelée. Vous pouvez utiliser une chape basse en béton. Ou vous pouvez (bien que la méthode ne soit pas scientifique, plutôt artisanale) en le remplissant de scories ordinaires, bien compactées et nivelées.
2. Posez des feuilles de contreplaqué ou de panneaux de fibres. Ils doivent être reliés les uns aux autres avec des agrafes.
3. Posez la vapeur et l'imperméabilisation sur le « faux » sol. Il s'agit généralement d'un film aluminium. Mais certains constructeurs expérimentés recommandent simplement de poser le film utilisé pour les murs des serres.
4. Si vous suivez les règles, la couche suivante est l'isolation (isoplex, laine minérale en dalles, etc.). Je suis uniquement pour le respect de la technologie. Mais, si la hauteur des plafonds ne permet pas de surélever le sol de manière aussi significative, mieux vaut se passer d'isolation. Après tout, l'épaisseur d'un sol à eau chaude est d'au moins 10 centimètres. Regarder,
- chape de nivellement – au moins 2 cm,
- contreplaqué – 2 cm,
- isolation – 2,5 cm,
- tuyaux - au moins 1,5 cm,
- revêtement de sol - quelques centimètres de plus,
total - 10 cm.
5. Si l'isolation est toujours installée, le film réfléchissant la chaleur doit être à nouveau placé dessus.
6. C’est à nouveau le temps de décalage. Ils doivent être cloués sur la surface renouvelée. Laissez une distance d'environ 2 centimètres entre eux.
7. Le tuyau du plancher chauffant sera posé dans les rainures. Pour l'isolation thermique, il est préférable d'envelopper le tuyau dans du papier d'aluminium. La distance de tangage entre les virages dépendra de la largeur du décalage. S'il atteint 10 centimètres, le diamètre du tuyau ne doit pas dépasser 16 mm.
8. Les tuyaux doivent être sécurisés. Ou faites-le avec des supports aux solives. Ou posez une tôle sur la structure.
Il faudra maintenant connecter le système à une source de chaleur, le tester et, si tout est en ordre, le revêtement de sol pourra être posé.
Option 2

Cette option, je vous le dis tout de suite, est moins correcte. Lorsque les solives ne sont pas démontées, elles doivent être renforcées. Une tôle couvrant toute la surface du sol est tout simplement nécessaire. Alors,
- La couche suivante est l'isolation. Nous connectons ses feuilles les unes aux autres, créant ainsi une base monolithique.
- Il vaut la peine de poser un support qui ne permettra pas à la chaleur de s'échapper vers le bas (voir point 3 de l'option 1).
- Vous devez maintenant découper des rainures dans l'isolant sur toute la longueur. Un tuyau y sera posé, à travers lequel circulera de l'eau chauffée.
- Sur le dessus se trouve un film réfléchissant la chaleur.
- Ensuite, vous devez poser Feuille OSB ou des panneaux de particules.
- Vous pouvez maintenant poser le revêtement de sol.
Un tel dispositif pour plancher d'eau chaude ne peut être réalisé que dans une pièce où il n'y a pas de meubles lourds et de mouvement constant de personnes. Sinon, la conception échouera.
Connexion au système
Le système de chauffage d'une maison en bois doit bien entendu prendre en compte la présence d'un plancher chauffant. Les solutions suivantes sont possibles ici :
- Toutes les pièces de la maison sont chauffées grâce au chauffage au sol,
- Le plancher chauffant ne chauffe qu'une partie des pièces.
Dans les deux cas, il faut une bonne chaudière capable de chauffer suffisamment système complexe. Vous ne pouvez pas vous passer d'une pompe, car la longueur des tuyaux sera plusieurs fois plus grande qu'avec version standard chauffage. Il convient également d'envisager des options pour fournir de l'eau à l'ensemble du système. Il existe également deux solutions possibles :
- Le sol et les radiateurs de chauffage forment un tout en boucle.
- Les tuyaux et les batteries forment un seul système. Le chauffage au sol en est un autre.
- Les sols chauds sont le seul système de chauffage de la maison.
Généralement, le système de chauffage est installé en parallèle. Certains ouvriers sont occupés à installer la chaudière. D'autres (si c'est dans une maison en bois) installent un système de chauffage utilisant des tuyaux et des radiateurs. Dans d'autres pièces libres, un tuyau pour plancher chauffant est posé.
S'il y a un plancher chauffant dans toute la maison, alors nous pouvons proposer le système d'installation suivant : les tuyaux sont posés en serpent ou en escargot dans chaque chambre séparée, depuis les locaux, les deux extrémités des tuyaux sont conduites dans le couloir, d'où tous les tuyaux sont conduits à la chaufferie.
L’installation de chauffage au sol idéale est celle qui dispose d’un raccordement séparé pour chaque pièce. Il sera alors possible de réguler la température et de contrôler la pression à tous les tours du système. Toutes ces subtilités doivent être réfléchies avant l'installation. Lorsque le sol chauffant est posé, mais qu'il n'y a pas encore de revêtement de sol sur le dessus, vous devez alimenter le système en eau, vous assurer qu'il n'y a pas de fuite et allumer la chaudière.
Le plancher chauffant doit être raccordé conformément schéma standard, où il est nécessaire de contrôler la pression de l'eau dans le système, ainsi que la température maximale (pour les latitudes avec des hivers modérés, elle ne doit pas dépasser 30 degrés à la sortie). Si à chaque étape il y avait un contrôle minutieux, qui garantit l'exécution selon un schéma qui fonctionne bien, alors le résultat ne fera que vous plaire. Économies de chaleur et d'énergie.
Quant au revêtement de sol, le conducteur thermique idéal est carreaux de céramique. Cependant, il est tout à fait possible de poser du linoléum, du stratifié et même du parquet par-dessus le système « sol chaud ». La seule chose qui vaut la peine d'être prise en compte est les matériaux dont la classe est assez élevée et dont le fabricant garantit une utilisation respectueuse de l'environnement. matériaux purs lors de leur création. Considérant que lorsqu'ils sont chauffés, la volatilité de certains composés nocifs augmente, et aussi que lorsque températures élevées le matériau se dilate, il n'est pas nécessaire d'économiser sur le revêtement de sol grâce au système « sol chaud ».
Vidéo sur l'installation de planchers chauffants dans une maison en bois :
Les sols chauds sont aujourd'hui un type de chauffage très populaire, utilisé à la fois indépendamment et avec d'autres systèmes. A son apparition, il était utilisé principalement aux premiers étages des immeubles, à l’aide d’une chape en béton.
Cette chape est assez lourde (environ 300 kg par m2) et ne peut pas être utilisée dans la plupart des cas. maisons en bois, en particulier aux deuxième et troisième étages, car les plafonds de la structure ne peuvent tout simplement pas supporter une telle charge.
Soyez le premier à installer des planchers chauffants sans chape humide commencé par les Finlandais, qui ont mis au point une technologie spéciale utilisant des feuilles de fibres hypnotiques. Au fil du temps, de plus en plus de nouvelles méthodes de coiffage sont apparues qui vous permettent d'utiliser ce type système de chauffage dans tous les bâtiments, quels que soient leur résistance et leur nombre d'étages. Ils facilitent la pose de tuyaux avec du liquide de refroidissement non seulement de manière complète bâtiments résidentiels, mais même dans des bâtiments aussi légers que sauna en bois ou des bains publics.
Aujourd'hui, nous allons examiner plusieurs façons installation étape par étape planchers chauffants sur bûches de bois, bien que dans ce cas ils soient beaucoup plus nombreux, et certaines modifications peuvent être apportées à chacun en fonction de caractéristiques de conception locaux.
Plancher à eau chaude pour parquet étape par étape
Nous réalisons donc un plancher d'eau sur du bois étape par étape. Si ce dernier doit être réalisé à partir de zéro, alors les travaux commenceront à partir des points suivants :
- Les bûches constituent la base d'un parquet et sa disposition commence dès leur pose. Ils sont posés à une distance de 60 cm les uns des autres, ce qui garantit haute qualité et la force de la future surface. La fixation est réalisée à l'aide de supports galvanisés spéciaux, qui peuvent être achetés dans n'importe quelle quincaillerie.
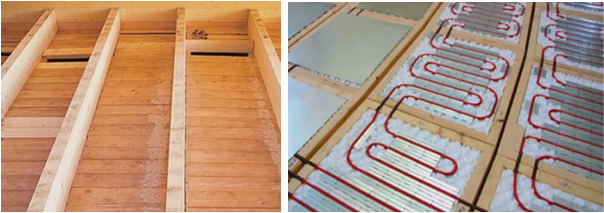
- Une fois les bûches fixées, un sous-plancher est constitué de planches ordinaires, nécessaires à la pose de l'imperméabilisation et de l'isolation. Les bûches elles-mêmes doivent également être enveloppées d'un film imperméabilisant. Comme isolant, vous pouvez utiliser une dalle minérale à base de basalte, posée en plusieurs couches de manière à ce que son épaisseur totale soit de 10 cm.
- Au-dessus de la couche d'isolation hydroélectrique et thermique, les planches du plancher principal sont posées et montées sur les bûches.

Si vous disposez déjà d'un parquet fini et que vous n'avez qu'à installer un plancher chauffant, vous sautez les points précédents et vous occupez exclusivement de la préparation de la base. Il est soigneusement nettoyé des débris et, si nécessaire, nivelé à un niveau acceptable.
DANS instructions étape par étape pour sol à eau chaude parquet La prochaine étape est la pose d'une chape sèche dans laquelle seront situés les tuyaux du plancher chauffant. Il peut être fabriqué à partir du plus différents matériaux: feuilles de fibres de gypse, polystyrène expansé, panneaux de particules et autres. Dans notre article sur la réalisation étape par étape d'un plancher chauffant à eau sur un socle en bois, nous examinerons l'option avec des panneaux de particules.
- Des panneaux de particules pré-préparés sont posés sur le sol fini. Pour découper correctement les fragments, une planche entière est fixée aux solives et un contour y est appliqué le long duquel seront situés les tuyaux. Les coins des bandes sont arrondis aux endroits où le système se pliera. Nous posons les fragments finis dans l'ordre suivant : d'abord, une rangée le long des murs, puis sur toute la surface de la pièce. On laisse un espace entre les bandes, suffisant pour y poser les tuyaux, mais en ne laissant pas trop d'espace libre.

Pose de panneaux de particules
2. Nous installons des dissipateurs de chaleur - des tôles spéciales en acier galvanisé ou en aluminium, et ayant profils spéciaux sous les canalisations. Ils sont nécessaires pour que le système fonctionne plus efficacement et pour que la chaleur soit répartie uniformément sur toute la surface du sol. Si vous souhaitez économiser de l'argent, vous pouvez utiliser des tôles de fer galvanisées ordinaires, vendues dans n'importe quelle quincaillerie. Leur épaisseur doit être de 0,5 mm. Les tôles sont fixées aux panneaux de particules posés à l'aide de simples clous.
3. Dans les rainures tôles nous posons les tuyaux du système de chauffage, qui sont ensuite connectés au collecteur.

4. Le système est testé sous pression (rempli d'eau et maintenu sous pression) pour garantir son étanchéité et sa fonctionnalité.
5. Des feuilles de contreplaqué sont fixées à la structure posée à l'aide de vis autotaraudeuses. Ils doivent avoir une épaisseur d'au moins 1 cm. Un espace de 0,5 mm de large est laissé entre le contreplaqué, qui peut être rempli de mastic si vous le souhaitez. Il est nécessaire de s'assurer que le sol fini ne se déforme pas si le bois absorbe l'humidité et se dilate.

6. Dans les instructions étape par étape pour un plancher chauffant à eau sur un support en bois, la dernière étape consiste à poser le revêtement de sol de finition. En utilisant la technologie décrite, il peut être fabriqué à partir de n'importe quel matériau - carrelage, stratifié, moquette. Si un stratifié est sélectionné, un support en contreplaqué n'est pas utilisé en raison de propriétés d'isolation thermique de ce matériel. Si vous devez poser du linoléum, vous ne devez pas choisir des options bon marché, car elles peuvent dégager une odeur désagréable lorsqu'elles sont chauffées.
Conseils : 1. Pour les planchers chauffants, il est préférable d'acheter des tuyaux d'un diamètre de 1,6 cm, car c'est dans ceux-ci que le liquide de refroidissement circule de la manière la plus optimale.
- La longueur du circuit de chauffage ne doit pas dépasser 100 m, car lors de déplacements sur de plus longues distances, le liquide de refroidissement refroidira et, dans certaines zones, la température du sol sera nettement inférieure. Si vous avez besoin d’un plan plus long, il est préférable de le diviser en sections.
- Afin de rendre le système de chauffage plus efficace, les experts recommandent d'utiliser un emballage en aluminium pour les tuyaux.
- Les modules en panneaux de particules, fraisés en usine et prêts à l'emploi, peuvent être achetés dans des magasins spécialisés. magasins de construction. Ces kits comprennent tous les composants nécessaires - des fixations aux dissipateurs de chaleur et tuyaux métalliques. Le coût de tels ensembles est nettement supérieur au prix des tôles conventionnelles, mais en même temps, les coûts de main-d'œuvre et le temps de création d'une chape sèche sont considérablement réduits.
- Sélectionnez le contour correct le long duquel vous poserez les tuyaux - le "serpent" est facile à poser, mais ne convient que pour petites pièces, car le liquide de refroidissement a le temps de refroidir en cours de route et des points froids se formeront dans certaines zones du sol. DANS grandes pièces Il est préférable d'utiliser une "spirale".
La deuxième option pour installer des planchers chauffants à l'aide de solives
Il existe une autre technologie qui pourrait plaire à beaucoup. Cela se fait étape par étape comme suit :
- Un faux plancher est réalisé entre les solives planches de bois, OSB et panneaux de particules.
- Une isolation est placée entre les poutres, qu'il est préférable d'utiliser sous forme de mousse de polystyrène avec bossages. Il possède non seulement d'excellentes propriétés de conductivité thermique, mais vous permet également de poser rapidement et facilement des tuyaux et des réflecteurs métalliques. La surface de l'isolant doit presque atteindre le bord supérieur de la solive, mais les éléments chauffants au sol ne doivent pas reposer contre le support.
- Des rainures sont préparées dans les solives aux endroits où les tuyaux les traverseront. Les tuyaux eux-mêmes doivent être enveloppés d'ondulation aux endroits où ils passeront à travers la rainure afin que, en raison de la dilatation thermique des matériaux, ils ne frottent pas contre le bois.
- Des réflecteurs de chaleur métalliques et des conduites d'eau sont posés.
- Le système est testé pour sa fonctionnalité et son étanchéité, après quoi vous pouvez commencer la fabrication du support et la finition.
Sol chaud avec isolation
Afin de raccourcir le processus de travail, les tuyaux de chauffage par le sol peuvent être placés directement sur la couche isolante située sur le plancher surélevé. Dans ce cas, seul le polystyrène doit être utilisé comme isolant, ce qui permettra au système de fonctionner le plus efficacement possible. La laine minérale n'a pas de propriétés thermoconductrices similaires.
À cette méthode les tuyaux seront situés en dessous du niveau des bûches. Espacez le niveau requis peut être rempli mélange de gypse, ou, si vous souhaitez éviter complètement les processus humides, remplissez-le de sable ordinaire. Ces matériaux deviendront une sorte d’analogue de la chape en béton, bien que moins efficaces, et conduiront la chaleur jusqu’au rez-de-chaussée.
L'option la plus simple pour poser des planchers chauffants sur solives
Il existe une option très simple pour poser des sols chauffants le long des solives, qui ne nécessite pas du tout de créer une chape. Il est beaucoup plus rapide à installer, mais il présente un inconvénient important : en raison du manque de matériaux conducteurs de chaleur, le sol chauffe moins bien et une certaine partie de la chaleur descend au lieu de monter. Grâce à cette technologie, les éléments de répartition de la chaleur sont fixés directement sur les solives elles-mêmes, et les tuyaux semblent s'affaisser dans leurs gouttières au-dessus du plancher surélevé. Dans ce cas, les plaques métalliques servent également de couche de nivellement supplémentaire avant finition sol.

Conclusion. Un plancher chauffant correctement conçu et installé peut influencer considérablement la température et créer environnement confortable dans la maison. Pose d'un plancher à eau chaude sur socle en bois– la tâche n'est pas aussi difficile qu'elle peut paraître au premier abord à une personne qui n'a pas beaucoup d'expérience dans la réalisation travaux de construction. Si vous suivez strictement les instructions, vous pourrez réaliser un système de chauffage de haute qualité qui durera depuis de nombreuses années. Il existe de nombreuses technologies pour installer des systèmes sur des bûches, chacun choisit donc celle qui lui convient le mieux, en fonction des caractéristiques de la pièce et de ses propres capacités.
Malgré le fait que beaucoup soient confiants dans la complexité de l'installation d'un plancher chauffant à eau, choisir les bons matériaux et en suivant la technologie il est tout à fait possible de fabriquer le vôtre cette conception même sans disponibilité expérience en construction. Après avoir étudié les matériaux décrits ci-dessous, vous saurez comment réaliser de vos propres mains un parquet chaleureux dans votre maison.
Types de planchers chauffants
Il existe aujourd'hui deux types de planchers chauffants : à eau et électrique. Cela vaut la peine d'être considéré

que beaucoup de gens préfèrent un plancher à eau conçu pour être posé sur un support en bois. Un plancher électrique est un système conducteur relié par des tapis chauffants, qui peuvent être remplacés par un câble ou un film chauffant (selon la puissance souhaitée).
Le choix se porte en faveur d'un plancher d'eau, puisque le système de tuyaux de chauffage à circulation eau chaude complètement caché derrière le parquet.
Même si un parquet est utilisé depuis longtemps, il n’y a aucune interdiction d’installer un plancher chauffant. Le rôle principal est joué par le revêtement de finition, dont les caractéristiques peuvent être obtenues auprès du vendeur en magasin ou auprès du fabricant.
Points importants lors de l'installation

Lorsqu’on réalise ce type de travaux pour la première fois, il est nécessaire de se préparer théoriquement et de prendre en compte plusieurs points au cours du processus.

Faites attention! Les planches de la base doivent être posées le plus étroitement possible sans aucun espace, sinon elles doivent être posées matériau d'isolation thermique. Mais si un parquet est impropre à l’usage, la meilleure solution est de le démonter.
Cas où le remplacement de la base est requis :
- manque d'isolation et courants d'air sous le sol ;
- le pas entre les décalages dépasse la distance de 60 cm ;
- si les planches doivent être rabotées. Cela sera nécessaire dans le cas où un stratifié est prévu comme revêtement de finition, car selon la technologie de sa pose, les irrégularités sur la base ne doivent pas dépasser 2 mm. Le stratifié ne fournissant pas de support, la base doit être soigneusement préparée.
Isolation du sol

Le plancher d'eau est installé sur un matériau calorifuge.
Après avoir posé les bûches à un intervalle de 60 cm, procédez à la construction d'un plancher surélevé en fixant du contreplaqué ou des planches usagées sous les bûches. Isolation protégée des deux côtés film imperméabilisant, est posé entre les solives.
Faites attention! Le polyéthylène ordinaire ne convient pas comme matériau d'étanchéité, car il favorise la formation de condensation et, par conséquent, l'humidification de l'isolant.
Il est optimal à utiliser comme matériau isolant laine minérale en dalles.
Planches de parquet

Tout d'abord, il est nécessaire de préparer des rainures pour la pose des tuyaux du système de plancher chauffant.
Les planches sont posées de manière à ce qu'il y ait une rainure de 2*2 cm entre elles et à la fin il y a une rainure forme ronde pour cintrer des tuyaux. Sur ce travail préparatoire peut être considéré comme terminé et exécution correcte ils ne devraient pas prendre plus de 12 heures.
Instructions de pose de tuyaux

- Étalez du papier d'aluminium roulé sur la surface des rainures longitudinales et posez des tuyaux métal-plastique d'une taille de 1,6 cm dans les rainures du dessus, enveloppez les tuyaux avec du papier d'aluminium et fixez les bords avec une agrafeuse.
- Pour éviter que les tuyaux ne glissent hors de la rainure, fixez-les avec des plaques métalliques en les plaçant en travers de la rainure. Posez les tuyaux sur toute la surface de la même manière.

Cette étape est la plus difficile. Il y a deux manières de procéder ici :

Faites attention! En aucun cas un plancher en bois chaud ne doit être raccordé à une source d'alimentation centralisée. système de chauffage sans autorisation particulière, c'est pourquoi son installation s'effectue principalement dans des habitations privées.
Après avoir terminé les travaux de connexion, en obligatoire il est nécessaire de vérifier le système pour détecter les fuites et les défauts, sinon vous devrez faire face à des coûts importants pour réinstaller le plancher chauffant et remplacer le revêtement de sol.
Pose de revêtement de sol

Assortiment revêtements de sol assez large, mais il faut faire un choix en tenant compte de sa conductivité thermique. Veuillez noter que le bois conduit la chaleur bien moins bien que les carreaux de céramique, ce facteur ne peut donc être ignoré.
Après avoir opté pour le stratifié, qui devient de plus en plus populaire, l'installation doit être effectuée selon sa technologie, et pour cela vous n'aurez pas besoin de plus de 3 jours sans investissements financiers importants.
Ainsi, vous êtes convaincu que l'installation d'un plancher chauffant à eau sur un socle en bois est assez efficace et accessible à toute personne ayant une attitude responsable face à cette démarche.
Vidéo
La vidéo suivante décrit en détail le processus d'installation d'un plancher à eau chauffant sur un socle en béton :
Et voici comment un plancher à eau chaude est installé sur un socle en bois :